Jim.G
Aeroponics: A Revolutionary Approach to Sustainable Farming
Aeroponics – A Beginners Guide
Table of Contents
- Introduction
- What is Aeroponics?
- Mechanics of Aeroponic Food Production
- Costs Involved
- Benefits of Aeroponics
- Problems and Challenges
- Aeroponics vs Traditional Hydroponics
- Crops Particularly Benefited in the USA
- Conclusion
- References
Introduction
Welcome to the exciting world of aeroponics—a revolutionary method of growing plants that promises higher yields, faster growth, and a more sustainable future for food production. If you’re an amateur gardener, small-scale farmer, or simply someone intrigued by innovative farming techniques, you’ve landed on the perfect guide.
In this comprehensive article, we’ll delve into the mechanics of aeroponic food production, giving you an in-depth understanding of how it works. We’ll also evaluate the costs involved, so you can determine if this system fits within your budget. Aeroponics isn’t just about fascinating technology; it also has practical advantages. We’ll explore the benefits of aeroponics and how it compares to traditional hydroponic systems, as well as some challenges you might face.
To top it all off, we’ll look at specific crops that thrive in aeroponic systems, especially focusing on varieties that are particularly well-suited for growing in the USA.
So, let’s embark on this aeroponic journey together, shall we?
What is Aeroponics?
You’ve probably heard of hydroponics, where plants are grown in a nutrient-rich water solution rather than soil. But what about aeroponics? The term may sound like it belongs in a sci-fi movie, but it’s a reality that’s transforming the way we think about agriculture.
Defining Aeroponics
Aeroponics is a soil-less growing method in which plant roots are suspended in air and misted with nutrient-rich water. Unlike hydroponics, which submerges roots in a nutrient solution, aeroponics allows the roots to breathe more freely, facilitating better nutrient absorption and faster growth. The word “aeroponic” is derived from the Greek words ‘aero-‘ meaning air, and ‘ponos’ meaning labor, essentially encapsulating the concept of “air work.”
The Technology Behind Aeroponics
The genius behind aeroponics lies in its efficient use of resources. A specialized pump mist-sprays the plant roots with a nutrient solution at regular intervals, providing the essential elements they need to grow. The droplet size is carefully calibrated to maximize nutrient uptake, while a timer controls the misting frequency to prevent root rot and other diseases.
In summary, aeroponics is an advanced yet approachable method of soil-less growing that offers an array of advantages, from quicker harvest cycles to more sustainable resource use. It’s a fascinating intersection of biology, technology, and sustainability, and it’s accessible to gardeners and farmers of all levels.
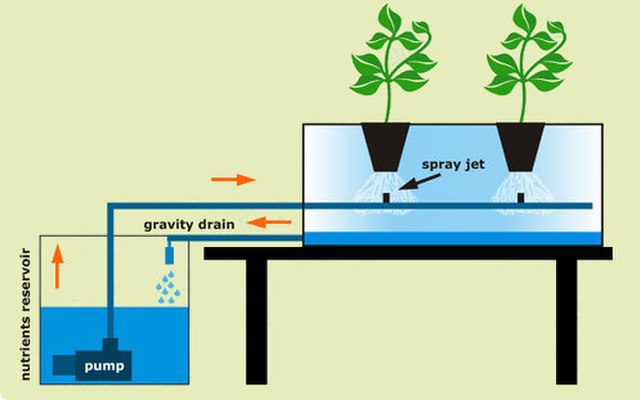
Mechanics of Aeroponic Food Production
If you’re intrigued by the concept of aeroponics and wondering how it all works, you’re in the right place. In this section, we’ll break down the essential components and processes that make aeroponic food production not just possible, but highly efficient.
Components of an Aeroponic System
To understand how aeroponics works, it’s crucial to become familiar with its primary components:
Reservoir
This is where the nutrient-rich water solution is stored. The reservoir is connected to a pump that sends the solution to the roots via spray nozzles.
Pump
The pump is the heart of the aeroponic system, responsible for circulating the nutrient solution from the reservoir to the plants.
Spray Nozzles
These are strategically placed to mist the plant roots with the nutrient solution. The droplet size and spray pattern are calibrated for optimal nutrient uptake.
Plant Holders
These structures hold the plants in place, ensuring that their roots are exposed to the nutrient mist. The design often allows for easy access to the roots for monitoring and maintenance.
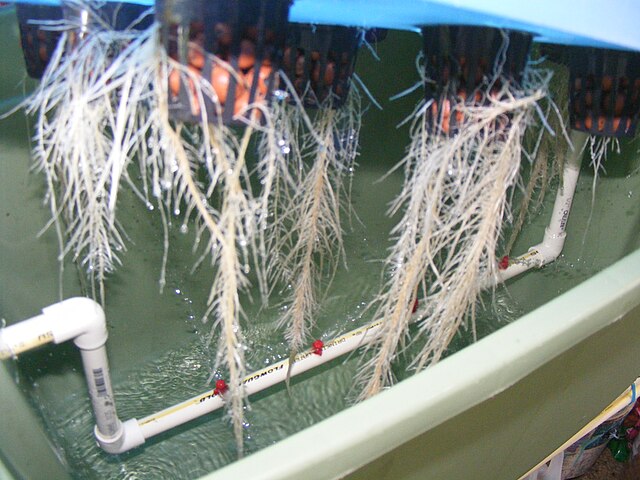
View of plant roots in aeroponics system
Nutrient Solution
A mixture of water and essential plant nutrients, the solution is what feeds the plants, promoting growth and development.
The Aeroponic Process
Now, let’s look at how these components work together in a typical aeroponic cycle:
- Spraying: The pump activates, sending the nutrient solution through the spray nozzles.
- Oxygenation: As the mist settles, the roots absorb both the nutrients and the surrounding oxygen, a key element for plant growth.
- Nutrient Uptake: The fine mist allows for excellent absorption of nutrients, promoting faster growth and healthier plants.
Setting Up Your Own Aeroponic System
Whether you’re a DIY enthusiast or prefer a plug-and-play solution, there are options for you:
- DIY Systems: These are often less expensive but require a good understanding of the mechanics involved. You’ll need to purchase pumps, nozzles, and other components separately.
- Commercial Systems: These are ready-to-use setups that come with everything you need, making them ideal for beginners or those who prefer a hassle-free experience.
Either way, setting up an aeroponic system is a rewarding project that pays off with superior plant growth and quality.
With a grasp of these mechanics, you’re well on your way to understanding the fascinating world of aeroponics. Up next, we’ll dive into the costs involved in setting up and maintaining an aeroponic system.
Costs Involved
So you’re sold on the idea of aeroponics and can’t wait to dive in, but what about the financial aspect? Setting up and maintaining an aeroponic system does involve some costs, and it’s important to understand these before you take the plunge. Let’s break it down.
Initial Setup Costs
The first and most obvious expense is the initial setup. Depending on whether you’re going the DIY route or opting for a commercial system, the costs can vary significantly.
Equipment
- Reservoir: Around $50 – $100
- Pump: Approximately $40 – $100
- Spray Nozzles: $10 – $20 per nozzle
- Plant Holders: $20 – $50 depending on material and size
- Lighting (if indoor): $50 – $300 depending on quality and coverage
Nutrient Solutions
A quality nutrient solution can cost between $20 and $50 for a gallon, which can last for several weeks depending on the size of your system.
Ongoing Costs
After the initial setup, there are some recurring expenses to consider:
Electricity
The pump and, if applicable, indoor lighting will consume electricity. Depending on your local rates, this can add an extra $10 – $30 to your monthly bills.
Maintenance
Parts may wear out or break down over time, requiring replacement. Budget around $50 – $100 per year for general maintenance.
Cost Comparison with Traditional Hydroponics
When compared to traditional hydroponics, aeroponics often has a higher initial setup cost due to the specialized equipment like fine mist nozzles. However, the ongoing costs can be lower due to reduced water and nutrient usage, potentially offsetting the initial investment over time.
Understanding the costs involved will help you make an informed decision about whether aeroponics is the right choice for you. With this knowledge in hand, you’ll be better prepared to plan your budget and get your system up and running.
Benefits of Aeroponics
You’ve learned about the mechanics and the costs, but what about the rewards? Aeroponics isn’t just a trendy buzzword; it’s a method that offers tangible advantages over traditional growing techniques. Whether you’re an amateur gardener or a small-scale farmer, here’s why you might want to consider going the aeroponic route.
Faster Growth Rates
One of the most enticing benefits of aeroponics is the accelerated growth of plants. Because roots are exposed to more oxygen and can absorb nutrients more efficiently, plants often grow at a much faster rate compared to soil-based or even hydroponic systems. According to NASA, plants grow up to three times faster in aeroponic growing systems than in soil. On the other hand, hydroponically grown plants grow 30 to 50% faster than soil-grown plants. Both aeroponic and hydroponic systems compare favorably to traditional soil-based plant growing.
Lower Water Usage
Aeroponics is incredibly water-efficient. The misting system delivers just enough moisture to the roots, minimizing waste. Some reports suggest that aeroponics can use up to 95% less water than traditional soil farming and about 40% less than hydroponics.
Easier Sterilization and Lower Risk of Disease
The design of aeroponic systems allows for easier sterilization of components, reducing the risk of plant diseases. The absence of soil also eliminates soil-borne pests and diseases, making it easier to maintain a healthy growing environment.
Space Efficiency
Aeroponic systems are generally compact and can be stacked vertically, making them ideal for urban settings or any situation where space is at a premium. This makes it possible to grow more plants in a smaller area, increasing yield per square foot. Indeed the aeroponic systems are often called “grow towers”.
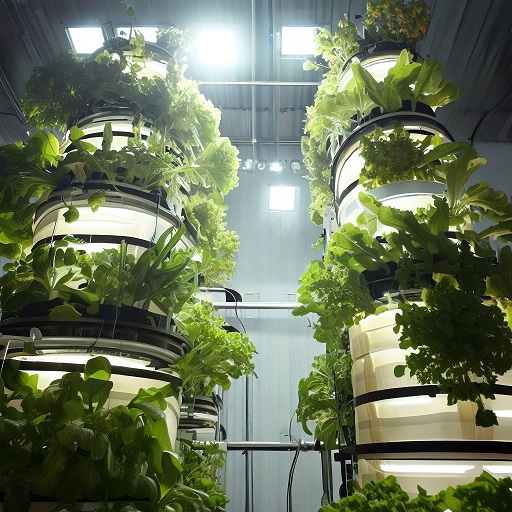
Tower aeroponics system
As you can see, aeroponics offers a slew of benefits that make it an attractive option for anyone interested in efficient and sustainable growing methods. Whether you’re focused on maximizing yield, conserving water, or simply experimenting with cutting-edge gardening technology, aeroponics has something to offer.
Problems and Challenges
While aeroponics boasts a multitude of benefits, it’s essential to consider the challenges and problems you may face. Understanding these obstacles can help you prepare better and make your aeroponic journey smoother. Here’s what you should know:
Complexity of System Management
An aeroponic system’s success hinges on the precise management of various components, from the misting schedule to nutrient concentrations. Even slight imbalances can adversely affect plant health, making it a method that requires careful monitoring and adjustments.
Risk of System Failure
In aeroponics, your plants are entirely dependent on the automated systems to receive nutrients and water. A pump failure or nozzle clogging could lead to rapid plant stress or even death if not addressed promptly. This risk makes it crucial to regularly check the system’s components and perhaps even have backup systems in place.
Nutrient Management
While the misting system allows for efficient nutrient uptake, it can also lead to nutrient imbalances if not properly managed. Over-nutrition or under-nutrition can occur, requiring you to closely monitor nutrient levels and adjust the solution as needed.
Initial Learning Curve
If you’re new to soilless growing methods, aeroponics might present a steep learning curve. From understanding the mechanics to managing the system, you’ll need to invest time and effort into mastering various aspects of aeroponic growing.
By being aware of these potential challenges, you can take proactive steps to mitigate risks and ensure the success of your aeroponic system. With proper planning and ongoing attention, most of these challenges can be overcome, allowing you to enjoy the numerous benefits that aeroponics has to offer.
Aeroponics vs Traditional Hydroponics
If you’re on the fence about whether to choose aeroponics or stick with the more familiar hydroponics, this section is for you. Both methods have their merits, but they also have unique features that might make one more suitable for your specific needs than the other. Let’s delve into the key differences:
Nutrient Uptake
- Aeroponics: Offers superior nutrient uptake due to the misting system that sprays nutrient-rich droplets directly onto the roots.
- Hydroponics: Efficient but generally less so than aeroponics, as the roots are submerged in the nutrient solution, which may limit oxygen uptake.
Space Utilization
- Aeroponics: Highly space-efficient, allowing for vertical stacking and higher plant density.
- Hydroponics: Requires more horizontal space and generally less suited for vertical farming.
Cost
- Aeroponics: Often has a higher initial setup cost but can be more cost-effective in the long run due to lower water and nutrient needs.
- Hydroponics: Typically cheaper to set up but may involve higher ongoing costs, especially for water and nutrients.
Complexity
- Aeroponics: Requires more precise control and monitoring, making it somewhat complex for beginners.
- Hydroponics: Generally simpler to manage, making it more beginner-friendly but potentially less efficient for advanced growers.
| Criteria | Aeroponics | Traditional Hydroponics |
|---|---|---|
| Nutrient Uptake | Superior due to direct misting on roots. | Efficient but generally less so than aeroponics. |
| Space Utilization | Highly space-efficient; suitable for vertical farming | Requires more horizontal space; less vertical. |
| Cost | Higher initial cost but lower ongoing expenses. | Lower initial cost but potentially higher ongoing expenses. |
| Complexity | More complex; requires precise control. | Simpler to manage; more beginner-friendly. |
Choosing between aeroponics and traditional hydroponics depends on your specific needs, level of expertise, and what you hope to achieve with your growing system. Each has its own set of advantages and challenges, so consider what matters most to you as you make your decision.
Crops Particularly Benefited in the USA
So, you’re almost sold on the idea of aeroponics, but you’re wondering, “What can I grow?” The good news is, aeroponics is versatile, and many plants thrive in this type of system. However, some crops are especially well-suited for aeroponic growing methods, particularly when applied in the United States. Here’s a rundown:
Leafy Greens
- Lettuce: A quick-growing crop, ideal for aeroponic systems.
- Kale: Benefits from the efficient nutrient uptake in aeroponics.
- Spinach: Another fast grower that thrives in high-oxygen environments.
Herbs
- Basil: Loves the quick nutrient uptake and grows exceptionally well.
- Cilantro: Grows faster and tends to be more aromatic in aeroponic systems.
- Mint: Thrives in aeroponics due to its preference for well-aerated root zones.
Fruits
- Strawberries: Can be grown more efficiently in vertical aeroponic systems, making them ideal for space-limited areas.
- Tomatoes: While challenging, small tomato varieties like cherry tomatoes can succeed in aeroponic systems.
Specialty Crops
- Medicinal Plants: Many medicinal herbs like lavender and chamomile respond well to the controlled environment of aeroponics.
- Exotic Plants: Some exotic plants that are hard to grow in soil thrive in the controlled conditions of an aeroponic system.
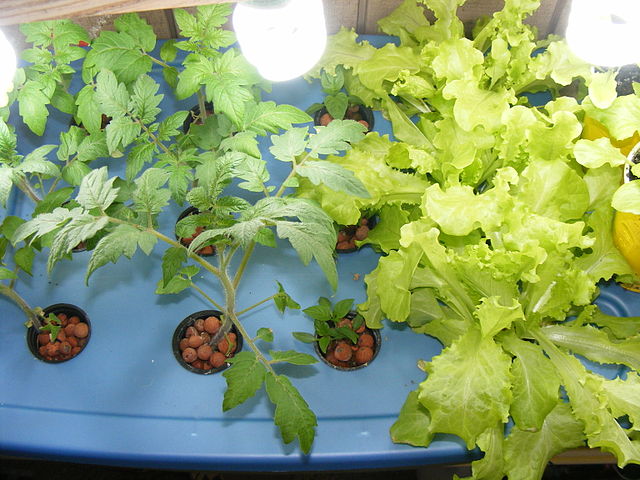
Aeroponically grown lettuce and tomato
Whether you’re interested in growing fresh herbs for your kitchen, cultivating your own fruits, or experimenting with specialty plants, aeroponics offers a versatile platform for a variety of plants. Specifically, the crops mentioned above are particularly benefited when grown aeroponically in the USA, making them excellent choices for your first aeroponic adventure.
Conclusion
Congratulations, you’ve journeyed through the fascinating landscape of aeroponics! From its cutting-edge technology to its practical benefits and challenges, aeroponics offers a compelling alternative to traditional growing methods. As we’ve seen, this innovative approach to agriculture holds promise for faster growth rates, efficient use of space, and sustainable resource management.
Whether you’re an amateur gardener, a small-scale farmer, or someone simply interested in sustainable food production, aeroponics presents an exciting avenue to explore. It may have its complexities and initial costs, but the long-term benefits often outweigh the challenges, especially if you’re committed to mastering the craft.
If you’re based in the USA, you have the added advantage of a variety of crops that are particularly well-suited to aeroponic methods. From leafy greens and herbs to fruits and specialty crops, the options are plentiful.
As you contemplate diving into aeroponics, consider what you hope to achieve, whether it’s maximizing yield, experimenting with unique crops, or contributing to a more sustainable future. With proper planning, research, and a bit of adventurous spirit, you can turn your aeroponic aspirations into a thriving reality.
Thank you for joining us on this exploratory journey into the world of aeroponics. We hope this comprehensive guide has armed you with the knowledge and inspiration you need to take your next steps.
Ready to give aeroponics a try? The sky—or perhaps, the ceiling—is the limit!
References
- “Aeroponics: A Sustainable Alternative to Conventional Agriculture Methods,” Journal of Sustainable Agriculture
- “Efficiency of Aeroponic Systems in Urban Agriculture,” Urban Farming Today
- “Comparative Study of Hydroponics and Aeroponics,” Agricultural Engineering International
5 Budget Fridges For Storing Microgreens
The Game-Changing Solution: Portable Fridges for Microgreens
If you’ve ventured into the fast-growing, eco-conscious world of microgreens, you know that these tiny but mighty greens require a lot of attention to detail. From seed to harvest, every aspect demands your careful consideration. But what about after the harvest? How do you ensure that these nutrient-packed greens reach the market in prime condition? Enter the portable fridge—a game-changing solution that can elevate your microgreens business to new heights.
A Fresh Perspective
Imagine spending countless hours nurturing your microgreens only to find them wilted and lifeless before they even reach the market. It’s a heartbreaking scenario that no farmer wants to encounter. Microgreens, with their high nutrient density and sensitive nature, require optimal storage conditions to retain their freshness, flavor, and nutritional value.
Storing your microgreens at the right temperature and humidity level is crucial. It not only extends their shelf life but also ensures they reach the consumer in the best possible condition. While traditional refrigeration units can get the job done, they lack the flexibility and convenience needed for transporting your greens to various market locations. This is where a portable fridge shines.
Why Portable Fridges are a Perfect Match for Microgreens
1. Mobility and Flexibility
In today’s fast-paced world, mobility is key. A portable fridge offers the kind of flexibility that static refrigerators can’t. Whether you’re attending a local farmer’s market or a high-profile food expo, a portable fridge ensures your microgreens remain fresh and vibrant, no matter the location.
2. Precise Temperature Control
Microgreens are sensitive to temperature fluctuations. Even a slight change in temperature can lead to wilting or the growth of harmful bacteria. Most portable fridges come with advanced temperature control features that allow you to set and maintain the ideal temperature for your greens.
3. Humidity Regulation
Excessive moisture can be a death sentence for microgreens. Portable fridges often feature built-in humidity controls that help keep moisture levels in check, ensuring your greens remain crisp and fresh.
4. Energy Efficiency
With sustainability being a significant concern, portable fridges are increasingly being designed to be energy-efficient. This is particularly beneficial for microgreens growers who are often passionate about eco-friendly solutions.
5. Compact yet Spacious
Don’t let the term ‘portable’ fool you. These fridges are designed to maximize storage space. The shelving and compartments can usually be customized to fit your specific needs, making it easy to store various types of microgreens.
6. Long-Term Investment
Although the upfront cost of a portable fridge can be higher than other storage options, consider it a long-term investment. The benefits of extended shelf-life, reduced waste, and increased sales often outweigh the initial expense.
Meeting the Market Needs
As the farm-to-table movement gains traction, consumers are becoming increasingly discerning about the quality and source of their food. When you show up at a market with microgreens that are visibly fresher and more vibrant than your competitors’, you’re more likely to attract and retain customers. A portable fridge can be your secret weapon in meeting and exceeding market expectations.
The Convergence of Technology and Farming
We are in an era where technology and traditional farming practices are converging to create revolutionary solutions. The portable fridge is a perfect example of this synergy. By leveraging modern refrigeration technology, microgreens growers can optimize their operations for efficiency and quality, ensuring that these superfoods are enjoyed at their best.
Conclusion
When it comes to the microgreens business, every small detail counts. From the quality of the seeds to the harvesting techniques, and most crucially, how these greens are stored and transported. Investing in a portable fridge is not just a purchase; it’s a commitment to quality, sustainability, and the long-term success of your microgreens venture.
In the upcoming sections, we’ll dive into the specifics, reviewing the five best portable fridges available in the USA that are ideal for taking your microgreens to market. Stay tuned for insights that could revolutionize your microgreens business.
Our Picks
- Alpicool C20 Portable Car Fridge Freezer: This is a 20-liter fridge that can hold up to 30 cans of drinks or nine bottles of wine. It can freeze down to -20℃ and has low, medium, and high settings for battery protection. It can run on 12/24V DC, 110V-240V AC power, and small solar systems. It weighs only 9 kg and has a durable material. The dimensions are 23.1 x 12.6 x 12.6 inches. The average price is $1991.
- Wagan 12V Portable Electric Cooler/Warmer: This is a 24-liter fridge that can cool down to 2ºC in half an hour and heat up to 60ºC. It has two temperature settings and a 7-foot DC power cord. It also has a heavy-duty handle and a removable lid. The dimensions are 16.7 x 11 x 8 inches. The average price is $892.
- Cooluli Mini Fridge Electric Cooler and Warmer: This is a super lightweight (2.2 kg) thermoelectric mini fridge with a 4-liter capacity. It has a sleek design and is available in seven colors. It can cool down to 40ºF below ambient temperature and warm up to 149ºF. It is Freon-free and eco-friendly. It can run on AC, DC, and USB power sources. It is perfect for skincare & beauty products like serums, creams, and medications. The dimensions are 10.2 x 7.7 x 10.5 inches. The average price is $493.
- Koolatron D25 Hybrid Portable 12V Lightweight Cooler Bag: This is a collapsible fridge that is made with a waterproof soft-sided bag and is a perfect choice for traveling. It holds up to 25 liters and has a 50 lbs load capacity. It uses thermoelectric technology and a brushless fan motor. It can cool down to 22°C below the surrounding temperature. It has an adjustable shoulder strap and a zippered pocket for storage. The dimensions are 9 x 17 x 15 inches when expanded and 4 x 17 x 15 inches when collapsed. The average price is $994.
- Dometic CFX-65 60L Portable Compressor Fridge Freezer: This is a portable compressor freezer that has a compact design and a 60-liter capacity. It has two separate compartments for cooling and freezing, and can reach -22ºC. It can run on 12/24V DC and 100-240V AC power sources. It has a built-in three-stage battery protection and an electronic thermostat. You can control the temperature directly on the unit or use the Wi-Fi app. The dimensions are 28 x 18 x 18 inches. The average price is $8995.
References
(1) The 2 Best Ways to Store Microgreens After Harvest.
(2) TOP-5 Best Portable Fridges in the UK in 2022 – Gadget-Reviews.
(3) Best mini fridge 2022: The best cold food storage options for portability.
(4) How to Store Microgreens After Harvest & Maximize Shelf Life.
Maximizing Freshness: How To Store Microgreens Correctly
Storing microgreens can be a daunting task, especially if you’re new to the world of these nutrient-packed greens.
Their delicate nature and short shelf life might make it seem impossible to keep them fresh for long. But here’s the thing…
Knowing how to store microgreens properly is what separates those who enjoy their vibrant flavors and nutritional benefits from those who end up with wilted, unusable plants.
Don’t let wilted, unusable plants be your fate – use the correct storage techniques to enjoy fresh microgreens for longer. With the right storage techniques, you can maximize freshness and extend their use beyond harvest time.
Table of Contents:
- Understanding Microgreens and Their Shelf Life
- The Art of Growing Microgreens
- Storing Microgreens Correctly for Freshness Retention
- Extending Your Microgreens’ Shelf Life Through Dehydration
- Refrigeration vs Freezing – Which is Better?
- Troubleshooting Common Issues in Storing Microgreens
- Making The Most Out Of Your Harvested Microgreen
- FAQs in Relation to How to Store Microgreens
- Conclusion
Understanding Microgreens and Their Shelf Life
The world of microgreens is a vibrant one, teeming with nutritional benefits. These tiny greens are harvested just after the first true leaves have developed and pack an impressive punch in terms of flavor and nutrition.
Common varieties such as radish microgreens, pea shoots, sunflower sprouts among others each carry their unique taste profile and nutrient content that can elevate any dish they’re added to.
Microgreen’s high levels of nutrients, however, come with a limited shelf life which makes proper storage crucial for maintaining freshness. Typically speaking most common microgreens tend to stay fresh up to 14 days if stored correctly ensuring you ample time to enjoy your harvest without losing out on its potent flavors or nutritious value.
Determining Freshness: Signs To Look Out For
To ensure peak consumption quality there are some telltale signs you should look out for when it comes down to determining freshness. First off would be color – freshly harvested green stems exhibit vibrant hues whereas wilted ones appear duller.
In addition, texture also plays an essential role here: crisp textures indicate fresh greens while those past their prime become noticeably limper. A third sign pointing towards reduced quality includes unpleasant odors signaling decay setting in. Finally, mold growth could potentially occur under improper storage conditions leading directly into our next topic: how best store these delicate crops? Stay tuned find out.
The Art of Growing Microgreens
Microgreens, the young vegetable greens harvested just after their otylcedon or first leaf pair have developed, are a powerhouse of nutrients. The process to grow these tiny plants is simple and requires minimal resources.
Your journey into growing microgreens begins with choosing the right seeds such as radish or pea shoots. These little green wonders not only add flavor to your dishes but also pack a punch in terms of nutritional value.
Watering Microgreens Before Harvesting
In cultivating microgreens, watering plays an essential role in determining both health and taste profiles. Care must be taken when watering to avoid over-saturation, which can lead to mold or root rot.
A gentle mist spray works well for watering young seedlings while bottom-watering methods work best as they mature. It’s all about striking that perfect balance between maintaining high internal moisture levels within each plant (which helps keep them fresh post-harvest) without making leaves externally wet – damp foliage can be breeding grounds for bacteria or fungi.
Gearing Up For Harvest Time
Come harvest time when your sprouts reach ideal size – typically past cotyledon stage – they’re ready. This generally occurs around 7-14 days post-germination depending on the variety chosen but always remember: freshness matters most so don’t delay once they’ve reached peak maturity level.
Whether you’re using kits available online or starting completely from scratch, the important thing is to enjoy the process and watch life unfold right in front of your eyes. It’s a rewarding experience in itself.
Storing Microgreens Correctly for Freshness Retention
When it comes to keeping your harvested microgreens fresh and flavorful, the right storage techniques are key. It’s all about striking a balance between maintaining internal moisture and warding off external dampness.
The refrigerator is often our go-to for preserving freshness in food items, including these nutrient-dense greens. But how do we ensure they’re stored correctly within this cool environment? Let’s explore some practical steps.
Picking Out Containers for Storage
For maximum shelf life, selecting the right container for your microgreens is essential as it can help regulate humidity and airflow to avoid spoilage caused by stagnant air or excessive moisture. Each type offers varying levels of protection against air exposure and excess humidity – factors that could hasten decay if not properly managed.
Research indicates plastic bags as a reliable option due to their ability to regulate humidity while allowing sufficient airflow; thus preventing mold growth or other spoilage issues related to stagnant air or excessive wetness.
Mason jars and glass containers serve similar purposes but with added visibility so you can keep track of any changes over time without having to open them up constantly. Resealable bags also make popular choices among hydroponic gardeners thanks largely because they’re easy-to-use, space-efficient, plus provide quick access whenever needed.
Balancing Air Flow & Condensation Within Containers
Airflow management inside your chosen storage vessel plays an integral role in prolonging the freshness period of stored microgreens by ensuring adequate oxygen supply necessary for maintaining vitality while avoiding harmful gas buildup from natural decomposition processes taking place at slower rates under refrigerated conditions.
To achieve this delicate balance, consider using breathable materials like paper towels together with sealed containers such as mason jars or plastic wrap, which help maintain optimal humidity levels during cold storage periods – just remember to place a slightly moist towel layer underneath before adding greens to absorb extra water and reduce condensation risks associated with storing produce inside fridges.
In addition to managing effective airflow internally, attention should be paid towards controlling the formation of high amounts of condensation too, as these could lead to soggy and faster rotting than desired, something every grower wants to avoid in order to extend the usability post-harvest stage.
Key Takeaway:
For maximum freshness, store microgreens in a cool environment using containers that balance humidity and airflow. Plastic bags, mason jars or resealable bags work well. Add a slightly moist paper towel to absorb extra water and reduce condensation risk inside fridges.
Extending Your Microgreens’ Shelf Life Through Dehydration
Storing microgreens correctly is essential to ensure their extended life expectancy, and dehydration has become a popular method among growers. One method that’s gaining popularity among microgreen growers is dehydration.
This process involves removing moisture from your greens, which not only extends their shelf life but also inhibits bacterial growth and other spoilage-causing organisms. The result? A bounty of nutrient-rich greens ready to use at any time – even up to five years later.
The Ins and Outs of Successful Dehydration
To kickstart the dehydrating process, it’s essential first to clean your harvested microgreens thoroughly before patting them dry. You can either lay them out on kitchen towels or employ a salad spinner until they’re completely devoid of water.
Next comes spreading these dried gems evenly across dehydrator trays without overlapping – this prevents uneven drying and potential mold development down the line. Consider investing in Nesco FD-75A Snackmaster Pro Food Dehydrator, if frequent dehydration is part of your plan.
Nutrient Retention During The Process
A common concern with food preservation methods like freezing or heat treatments has always been about nutrient loss. However, when done right, the majority of nutrients remain intact post-dehydration. In fact, according to research published by Journal Of The American College Of Nutrition, Vitamin A retains more than 90% of its initial levels after being exposed to temperatures around 140°F (60°C).
Safeguarding Dried Greens For Long-Term Use
Drying indeed prolongs shelf life dramatically; however, proper storage techniques ensure maximum freshness and usability over extended periods. So how should one store these treasures? Ideally, keep them away from direct sunlight inside an airtight container such as glass jars with tight-fitting lids for small quantities, whereas vacuum-sealed bags might be better suited for larger amounts. Always remember to label each container with the date and variety name so there’s no guesswork involved later.
Key Takeaway:
Storing microgreens properly is key to their longevity, and dehydration can extend their shelf life by years. Clean your greens thoroughly before drying them evenly across dehydrator trays, ensuring most nutrients remain intact. For long-term storage, keep dried greens in airtight containers away from sunlight and label each one for easy identification later on.
Refrigeration vs Freezing – Which is Better?
The question of whether to refrigerate or freeze microgreens can be a bit tricky. Both methods aim at prolonging the shelf life of your harvest, but they impact the quality and nutritional value differently.
Most hydroponic gardeners lean towards refrigerating their harvested greens. Let’s investigate why this is a preferred choice.
The Advantages of Refrigerating Microgreens
Storing microgreens in a refrigerator significantly slows down their metabolic processes. This slowed activity helps maintain freshness while extending these delicate plants’ lifespan.
Besides, when stored correctly within suitable containers like resealable bags or mason jars with damp paper towels inside, refrigerated microgreens tend to stay fresh longer than those kept at room temperature. The cool environment combined with controlled humidity levels helps preserve their crisp texture and vibrant color.
The Downside of Freezing Microgreens
You may assume that if chilling your greens keeps them fresh, then freezing would do an even better job, right? Unfortunately, not. When you freeze any plant material, including our beloved sprouts, there are some potential issues that arise which could affect the overall quality, taste, and nutritional content. Frozen water crystals formed during the freezing process cause damage to cellular structures, leading to a loss of integrity once thawed again, resulting in a mushy, unappetizing mess rather than the crisp leaf we all love and enjoy.
While it’s possible to freeze certain types of hardier varieties like radish and pea shoots, the majority of softer microgreens will suffer from the adverse effects mentioned above. Therefore, it is best to opt for refrigeration as the preferred method of preservation. Refrigeration.
Remember, though, each variety is unique and has its own needs and requirements for optimal preservation. It’s always a good idea to experiment with small batches first before committing your entire harvest to one particular storage solution.
This way, you get the best of both worlds: extended shelf life without compromising the flavor and nutrient density of your favorite home-grown produce.
In a nutshell, although it may be tempting to try preserving microgreens using the freezer, it ultimately won’t yield the results you’re hoping for. Instead, focus on creating ideal conditions within the fridge to ensure that every bite is packed full of the goodness straight from the garden to your plate.
Key Takeaway:
Storing microgreens? Stick to the fridge, not the freezer. Refrigeration slows down metabolism and maintains freshness without compromising quality or nutrition. Freezing can damage cellular structures, leaving you with a mushy mess instead of crisp greens. Remember: each variety has unique needs, so experiment before committing your whole harvest.
Troubleshooting Common Issues in Storing Microgreens
Storing microgreens correctly to maintain their freshness can sometimes feel like a complex task. Nevertheless, with an awareness of the possible problems that could arise and strategies for tackling them, you can ensure your harvested microgreens remain fresh for a longer period.
Let’s dive into these potential problems and provide solutions on how they can be effectively addressed.
Ethylene-producing Fruits & Vegetables
The first thing we need to consider is ethylene gas – an invisible foe when it comes to storing unwashed microgreens. Certain fruits and vegetables are notorious producers of this plant hormone which accelerates ripening but also leads our precious greens towards premature wilting or yellowing if stored together without barriers in the refrigerator. Notable ethylene producers include apple, banana, melon, avocado and tomato.
Bacterial Growth in Stored Microgreens
Moving onto another challenge: bacterial growth. Bacteria thrive under wet conditions, so any excess dampness before storage or condensation within containers during refrigeration due to poor air flow management could lead to spoilage quicker than expected. This study published gives insights on bacteria growth on various sprouts including radish microgreen seeds.
This makes managing humidity levels while avoiding condensation critical, especially when using plastic bags or wrap as opposed to glass jars or resealable bags, allowing better circulation around your greens even when sealed tightly.
Maintaining Humidity Levels While Avoiding Condensation
Achieving a balance between maintaining high enough humidity to not dehydrate leaves yet low enough to avoid encouraging formation inside containers is tricky, particularly in the summer months where the ambient temperature in fridges tends to rise, causing trapped water vapor to turn into liquid form faster, creating a conducive environment for bacterial proliferation and thereby reducing shelf life drastically unless promptly addressed. Find out How Humidity And Condensation Work affecting food preservation efforts adversely here.
By recognizing these challenges early on, keeping a close eye on watering techniques prior to harvest, selecting appropriate containers, managing airflow, and preventing condensation, among others, you are one step closer to ensuring that those freshly harvested microgreens stay fresh long after leaving the hydroponic garden setup.
Key Takeaway:
Storing microgreens can be a juggling act between maintaining freshness and preventing spoilage. Beware of ethylene gas from certain fruits and veggies, as it’s the invisible enemy causing wilting. Keep an eagle eye on humidity levels to avoid bacterial growth – too much dampness is their playground. Lastly, choose your storage containers wisely for better airflow management. It’s all about finding that sweet spot in storage conditions to keep your greens fresh as a daisy.
Making The Most Out Of Your Harvested Microgreen
When it comes to reaping the fruits of your labor in hydroponics, storing microgreens correctly is as crucial as growing them. It’s a vital step that determines how long these nutrient-packed greens stay fresh and retain their flavor after harvest.
Selecting Containers for Storage
The choice of container can significantly impact your harvested microgreens’ freshness retention. No matter what you pick – plastic bags, mason jars, glass containers or resealable sacks – each have their own pros and cons.
A damp paper towel inside any chosen storage option helps maintain necessary humidity levels without making the greens soggy from excess moisture. But remember, too much condensation could lead to spoilage over time.
Managing Air Flow and Condensation
If there’s one thing successful microgreen growers swear by when storing their produce post-harvest, it’s managing airflow within storage vessels effectively. This simple trick prevents unwanted mold growth due to excessive dampness caused by a lack of proper ventilation.
In sealed options such as resealable bags or screw-top jars, always leave some space at the top allowing air movement around packed-in produce, thereby preserving internal humidity conditions favorable for keeping those delicate leaves crisp and fresh longer than usual.
Troubleshooting Common Issues in Storing Microgreens
Ethylene-producing fruits and vegetables like ripe apples, bananas, tomatoes, among others, emit this gas that accelerates the ripening process of other surrounding items, including freshly-harvested tender shoots. Hence, it is advisable to separate different food groups whenever possible to avoid premature aging effects upon sensitive crops such as ours here under discussion.
All said and done, incorporating all these best practices will help maximize the enjoyment derived from every single sprout grown painstakingly at home, ensuring none goes to waste due to improper handling at the post-harvest stage. This, in turn, contributes towards the overall sustainability efforts that globally conscious citizens today strive to uphold through responsible gardening habits developed and nurtured over time, continual learning, and experimentation in the field of hydroponics and beyond.
Key Takeaway:
To keep your microgreens fresh and flavorful, choose the right storage container, manage airflow to prevent mold growth, and avoid storing them with ethylene-producing fruits. A damp paper towel can help maintain humidity levels without making the greens soggy. Remember, proper post-harvest handling ensures no sprout goes to waste.
FAQs in Relation to How to Store Microgreens
Can you store microgreens in mason jars?
Mason jars can be used for storing microgreens, but ensure they’re dry before storage to prevent moisture buildup, which may lead to spoilage.
Are you supposed to refrigerate microgreens?
Yes, refrigerating your harvested microgreens helps maintain their freshness and extend their shelf life.
How long can you keep microgreens in the fridge?
You can typically store most types of fresh and properly stored microgreens in the refrigerator for up to 14 days.
How do you store microgreens in bulk?
Bulk-stored microgreens should be kept cool and dry. Use airtight containers or resealable bags with damp paper towels inside to maintain humidity levels.
Conclusion
Understanding the world of microgreens is your first step towards preserving their freshness.
Their shelf life can differ, but with correct storage strategies, they can be enjoyed for up to two weeks or more.
Growing these nutrient-packed greens at home is a rewarding experience. The key? Watering correctly before harvest and choosing the right container for storage.
Managing airflow in your containers and preventing condensation will help maintain that crispness we all love in our microgreens.
If you’re looking to extend their shelf life even further, consider dehydration – it’s a game-changer!
Remember: refrigeration over freezing. Freezing might damage those delicate cellular structures we want intact for maximum nutritional benefits.
Ethylene-producing fruits and vegetables could be potential spoil-sports. Keep an eye out on what else goes into your refrigerator with your harvested greens!
You’ve now got all the knowledge needed on how to store microgreens effectively. But why stop there?
Dive deeper into hydroponics by joining us at Soilless Growers. We’ll guide you through growing nutritious plants without soil – from understanding plant nutrition requirements to setting up efficient watering systems. Come join our community today, let’s grow together!
How To Grow Watercress Without Soil: A Hydroponic Guide
The thought of growing any plant without soil might feel counterintuitive, even impossible to some. But let’s debunk that myth right now.
Growing watercress hydroponically is not only possible but it also offers numerous advantages over traditional gardening methods. Forget about the worry of soil-borne illnesses or bugs; hydroponic watercress cultivation eliminates that concern.
And if you’re wondering how exactly does one go about this process of growing watercress without soil? Well, we’ve got your back!
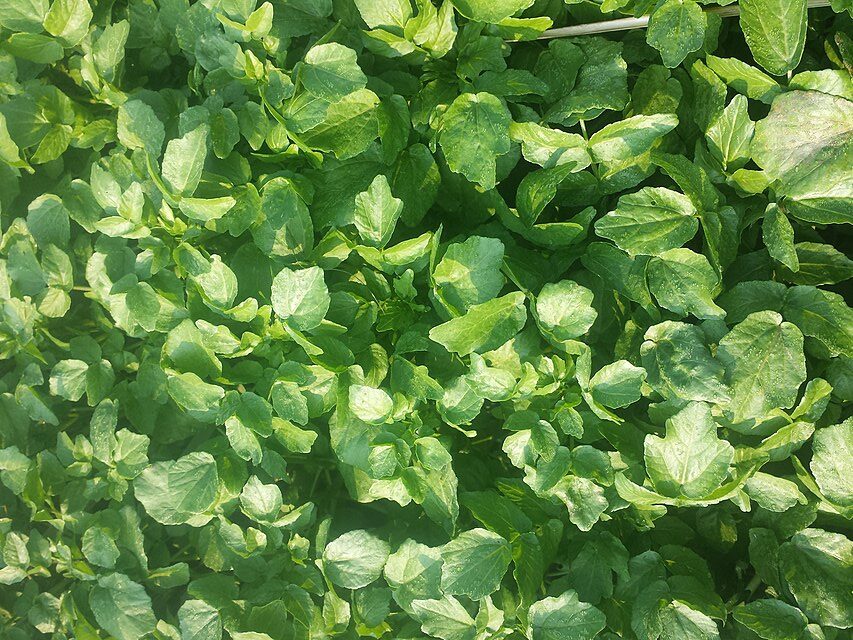
Table of Contents:
- The Wonders of Watercress
- The Health Benefits of Watercress
- Growing Watercress Without Soil – A Hands-Off Approach
- Creating the Ideal Environment for Growing Watercress
- How to Grow Organic Vegetables Like Watercress at Home
- Taking Care Of Your Watercress And Harvesting Them
- Your Reward: Harvesting Time
- Companion Plants For Your Garden Cresses
- Ways To Use Your Harvested Garden Cresses
- Tips For A Successful Hydroponic Gardening Experience
- FAQs in Relation to How to Grow Watercress Without Soil
- Conclusion
The Wonders of Watercress
Watercress, a peppery green vegetable that is often overlooked as merely a garnish on your plate, actually packs quite the nutritional punch. Naturally found in fresh water streams where it grows wild, this aquatic plant has been used for centuries both culinarily and medicinally.
In its natural environment or when grown indoors using hydroponics techniques – either way you choose to cultivate it – one thing remains consistent: The impressive health benefits offered by these leafy greens due to their high levels of vitamins A and C along with essential minerals like iron and calcium.
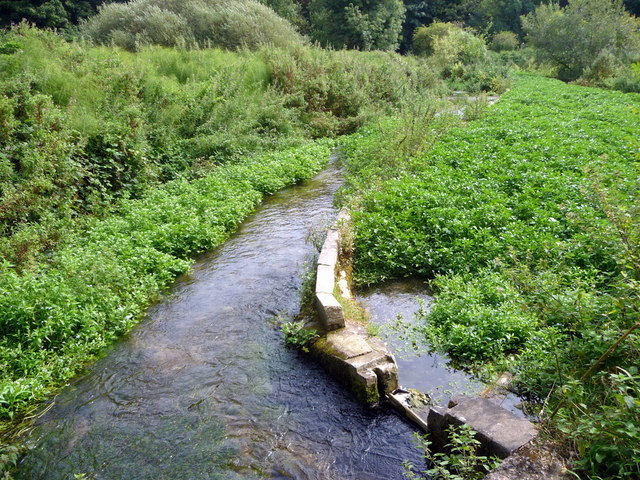
Traditional watercress beds
A Superfood Beyond Garnishing: Unpacking Watercress’ Nutritional Profile
If we were discussing superfoods – those nutrient-rich foods considered especially beneficial for our health – many might overlook ‘watercress’. However, packed with antioxidants which help protect our bodies against damage from free radicals, unstable molecules that can cause diseases including cancer, it’s worth reconsidering this humble veggie’s role in your diet.
- Packed with Vitamin C, an essential nutrient known for boosting immunity (45% RDA per 100g serving)
- Rich source of vitamin K which plays an important role in blood clotting and bone health (312% RDA per 100g serving)
- Fiber content aids digestion while eating cruciferous vegetables like watercress may lower risk factors associated with heart disease (4.1 g dietary fiber per 100g serving).
The Health Benefits of Watercress
Boasting an abundance of vitamins and minerals, including vitamin C, calcium, iron, and potassium – watercress is a nutrient-dense vegetable. It’s more than just an elegant garnish; it plays a vital role in maintaining optimal health.
Eating watercress has been associated with improved heart health due to its high dietary nitrate content that aids in lowering blood pressure. The antioxidants found within this leafy green can reduce the risk of chronic diseases like cancer by neutralizing harmful free radicals present inside our bodies.
Beyond physical benefits, regular consumption of watercress also contributes positively towards mental well-being. Its nutrient-rich profile supports brain function and could potentially slow cognitive decline linked to aging. Healthline provides additional information on these eating watercress health benefits.
Is Watercress Toxic for Pets?
A common query among pet owners considering adding watercress into their diet or garden pertains to whether it poses any threat to their furry friends’ well-being. While some plants are indeed toxic for pets if ingested excessively, rest assured that moderate amounts of wild watercress pose no harm at all.
Care should be taken though because overconsumption might lead to mild gastrointestinal upset in dogs and cats since they aren’t accustomed to digesting large quantities of leafy greens unlike humans. As always when introducing new foods into your pet’s diet, it’s best practice to consult with your vet first. The American Society for Prevention Cruelty Animals (ASPCA) confirms that while excessive consumption may cause diarrhea or vomiting due to its spiciness rather than toxicity per se, it is generally considered safe around household pets.
- If you’re cultivating hydroponically without soil, it’s essential to be extra vigilant in making sure any remaining pesticides or chemicals are completely removed from the foliage before giving them to animals. Remember, cleanliness is key to keeping both our gardens and furry companions healthy and happy.
Key Takeaway:
Watercress packs a nutritional punch, boosting heart health and brain function while posing no threat to pets when consumed moderately. However, cleanliness is crucial in hydroponic gardening to avoid harmful chemicals on the leaves.
Growing Watercress Without Soil – A Hands-Off Approach
When it comes to growing watercress, the traditional soil-based method is not your only option. In fact, there’s a hands-off approach that eliminates the need for dirt entirely.
This alternative process involves hydroponics, a form of agriculture where plants are grown in nutrient-rich water instead of soil. Ranging from basic home setups to large-scale commercial operations, hydroponic systems can vary in complexity.
Choosing Your Method – From Cuttings or Seeds?
The initial step in this journey towards becoming a successful grower guide for watercress without soil lies within making an important decision: cuttings or seeds? Both methods have their own unique set of advantages and challenges which should be considered carefully before proceeding further with your gardening adventure.
Cuttings involve taking pieces from mature plants and placing them directly into the hydroponic system. This technique tends to yield results faster than starting from seeds because you’re working with already developed plant parts speeding up growth time significantly.
If growing from seed sounds more appealing, due its potential variety benefits (as most heirloom varieties aren’t readily available as cuttings), keep in mind that patience will play a key role here since sprouts may take longer to appear above your chosen growth medium such rockwool cubes clay pebbles).
- Speed vs Variety: In essence both techniques hold merit depending on what matters most; if speed trumps all else then go ahead try out cutting propagation whereas those who prefer diversity might find seeding suits better their needs. Remember, each has pros and cons, so consider these factors wisely when deciding the best course of action. Moving forward in cultivating delicious nutritious crops at home, using innovative hands off watering systems – known widely throughout world today as simply ‘hydroponics’.
- Nature’s Way Is Not Always The Only Way: Mother Nature grows her bounty deep within earthy soils but, thanks to advancements in agricultural technology, we now possess the ability to replicate similar environments minus the mess associated with typical garden bed setups. With the added bonus of total control over environmental conditions including humidity, temperature, light exposure etc. Thus enabling us to achieve optimal yields regardless of the season outside our window.
- Pest Control Made Easy: No one enjoys dealing with pests, yet they seem an inevitable part of any outdoor or indoor gardening endeavor. Thankfully hydroponically grown crops tend to suffer less pest issues compared with their counterparts, primarily due to a lack of direct contact with the ground – hence limiting access for critters looking to snack on our green leaves.
Key Takeaway:
Growing watercress without soil, using hydroponics, is a hands-off approach that offers control over environmental conditions and less pest issues. You can start with either cuttings for quicker results or seeds for more variety. Remember, patience and wise decision-making are key to this innovative gardening adventure.
Creating the Ideal Environment for Growing Watercress
To cultivate a successful crop of watercress, one must recreate its natural environment. This involves focusing on aspects such as fresh water supply, light exposure, temperature control, and humidity management.
Climate & Aspect – What Does Watercress Prefer?
Luckily watercress is adaptable to varying climates and light conditions. However, it does have certain preferences which can help optimize growth if met correctly.
Naturally found in streams, in partial shade or full sun, with cool temperatures ranging from 50-70 degrees Fahrenheit (10-21 degrees Celsius), these are ideal conditions you should aim to replicate when growing your own batch at home.
Apart from maintaining proper lighting and temperature ranges, another crucial element lies with providing adequate humidity. High levels of moisture typically present around their native river habitats make them perfect candidates for hydroponic cultivation, where consistent watering schedules can be easily maintained without the risk of overwatering that traditional soil growers might face.
Fresh Water Requirements
As aquatic plants by nature, they require clean freshwater. Regularly replaced or topped up, every two weeks at least, to prevent the buildup of salts that could otherwise hinder plant development if left unchecked over time.
Sowing Seeds And Plant Depth Considerations
If seed harvesting seems like the preferred method to grow cresses, then sowing seeds approximately 1 cm deep would be recommended by most experienced gardeners out there. Providing ample space below the surface level alongside steady environmental factors diligently monitored till sprouts emerge after a seven-day post-sowing period is key here. Remember, patience plays a major role in this journey. Once they do start showing shoots, continue to keep a close eye, ensuring further progression into a mature, harvest-ready state down the line.
Key Takeaway:
Watercress thrives in a hydroponic setup, mimicking its natural river habitat. Key factors for successful growth include regular fresh water supply, cool temperatures between 50-70°F (10-21°C), ample light exposure, and sowing seeds about 1 cm deep. Patience is crucial to ensure healthy maturation.
How to Grow Organic Vegetables Like Watercress at Home
Growing organic vegetables such as watercress is a rewarding endeavor that provides you with fresh, nutritious produce right from your own home. Here are some methods and tips on how to grow this healthy green hydroponically.
How To Grow In Water From Cuttings
If soilless cultivation intrigues you, consider growing wild watercress from cuttings – an easy method for beginners. Start by selecting robust stems from mature plants and removing any leaves near the base of the stem.
Then place these cuttings in a container filled with clean freshwater. Within approximately one week, roots should start sprouting. Once they reach about 1 inch long, transfer them into larger containers containing nutrient-rich hydroponic solution for optimal growth.
How To Grow From Seeds
You can also choose seed harvesting watercress growing if it suits your preference or convenience better than using cuttings. Begin by filling up a pot or container having drainage holes placed over another vessel filled with fresh waters.
How To Grow In A Pond
If access to natural bodies of water like ponds isn’t an issue for you, then why not give pond cultivation of garden cresses a shot? It’s quite straightforward: get hold of planting baskets lined with coconut coir or other suitable materials that retain moisture, allowing for the free flow of nutrients through capillary action provided by the pond’s ecosystem itself.
Taking Care Of Your Watercress And Harvesting
Once you’ve planted your watercress seeds or cuttings, the journey to grow watercress doesn’t end there. It’s time for diligent care and maintenance of your plants.
Identifying And Managing Pests
Even in an indoor evironment the vibrant green leaves of flourishing watercress may draw in various pests, including snails, whiteflies, spider mites and lady beetles. These unwanted visitors have a knack for causing damage by nibbling on the foliage, which may hinder healthy growth.
A proactive approach is essential in managing these pesky invaders without harming your crop. Natural pest control methods are often recommended; introducing predatory insects like ladybugs that feed on harmful bugs could provide an effective solution while maintaining an organic gardening environment.
In addition to natural predators, using organic insecticidal soaps or oils sparingly can also help keep pests at bay. The key here is early identification followed by swift action.
Your Reward: Harvesting Time
The moment every hydroponics gardener looks forward to – harvesting. Typically 15-20 days from seeding when the plant has reached about 4 inches tall, it’s time to harvest those fresh crisp greens.

Time to enjoy your hydroponic watercress!
To ensure future yields, don’t pull up entire plants during harvesting but rather trim stems back, leaving approximately one inch above substrate level allowing regrowth. Here’s how experts suggest we go about this process.
Besides being delicious eaten raw in salads, sandwiches, etc., remember that freshly harvested garden cresses offer numerous health benefits thanks largely to its high nutritional content. Find out more benefits associated with incorporating this leafy green into our diets here.
Companion Plants For Your Garden Cresses
Garden cress doesn’t have to grow alone. It thrives when it’s paired with the right companion plants, and these companions can offer a multitude of benefits.
Chives: The Pest Deterrent
The first plant on our list is chives. These pungent herbs are known for their ability to ward off harmful insects that could pose threats to your watercress crop due to their strong scent acting as a natural deterrent.
Beyond just keeping pests at bay, chives also contribute valuable nutrients back into the hydroponic system’s water supply upon decomposition, thereby maintaining an optimal nutrient balance within your setup.
Peppermint: A Natural Repellent
Moving onto peppermint – another aromatic herb that doubles up as an excellent pest repellent thanks to its distinct smell which keeps various types of pests such as aphids and whiteflies away from your precious crops like garden cress.
In addition, peppermint grows vigorously, providing additional shade for more delicate crops like watercress during hotter periods or in sunnier climates where overheating or scorching leaves might be concerns you’d want mitigated effectively by this cool green ally.
Wintergreen: An Unexpected Ally
Last but certainly not least, we’ve got wintergreen. While perhaps less conventional than others mentioned here today – don’t underestimate what this little gem brings along with it. Wintergreen’s dense ground cover offers protection against substrate erosion while its small flowers attract beneficial insects aiding pollination processes if there are flowering plants nearby in proximity too.
Remember though, every hydroponic system will differ slightly depending upon factors such as light exposure levels, temperature control capabilities, etc., so do experiment with different combinations until you find what works best for yours.
Ways To Use Your Harvested Garden Cresses
Watercress is a versatile green that can add an exciting kick to your meals. This peppery plant not only brings flavor but also packs a nutritional punch. So how best can you utilize this superfood in your kitchen? Let’s explore.
In Salads
The distinct taste of garden cress makes it perfect for salads. It pairs well with other fresh vegetables like tomatoes and cucumbers while adding its unique spicy note.
If you’re feeling adventurous, Bon Appetit offers a Watercress Salad With Mustard Vinaigrette. The tangy mustard vinaigrette complements the crispness of watercress, creating an intriguing contrast on your palate.
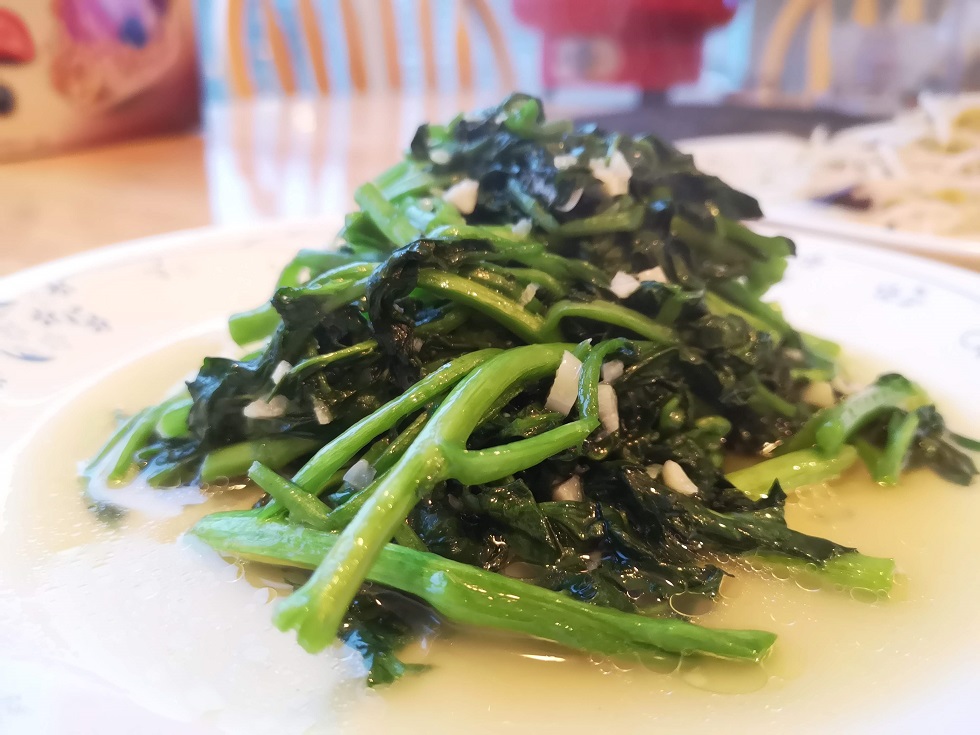
In stir frys
There are many ways to enjoy your hydroponic watercress crop in a stirfry!
Watercress stirfried
In Soups
Soups are another excellent way to incorporate garden cresses into your diet. Jamie Oliver’s Watercress Soup Recipe, for instance, blends potatoes and onions with generous handfuls of fresh watercress. A comforting dish indeed.
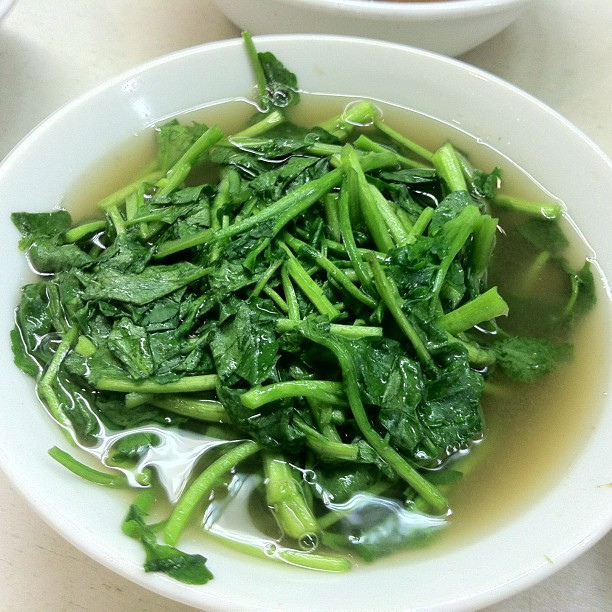
Delcious nuttritious watercress soup
In Sandwiches & Wraps
A classic British sandwich features finely chopped hard-boiled eggs mixed with mayonnaise topped off with sprigs of crunchy watercress. Pairing these sandwiches with homemade potato chips. With a refreshing iced tea, it creates a satisfying lunch option.
Beyond sandwiches, wraps also benefit from the addition of fresh watercress. Grilled chicken, avocado chunks, a dab of Greek yogurt, chives for garnish and watercress crumbles as the finishing touch. These wraps pack a punch in terms of both flavor and nutrition, making them an ideal grab-and-go breakfast choice for busy mornings.
Don’t be afraid to get creative and explore the various ways you can incorporate watercress into your meals. Whether you enjoy it uncooked or cooked, this flexible superfood can be utilized in your own cooking area with lots of options.
Key Takeaway:
Watercress, a nutritional powerhouse and versatile green, can spice up your meals in various ways. It’s perfect for salads, soups, sandwiches and wraps due to its unique spicy note. Don’t be afraid to experiment with this superfood according to your culinary preferences.
Tips For A Successful Hydroponic Gardening Experience
Hydroponic gardening presents a unique set of challenges, but also immense rewards. Here are some expert tips to help you navigate this exciting journey and ensure your success in growing crops hydroponically at home.
Selecting Suitable Plants for Your Setup
The first step towards successful soilless farming is choosing the right plants. Some herbs and vegetables adapt better to water-based environments than others. Watercress, lettuce, spinach, and basil have proven themselves as excellent choices due to their fast growth rates and relatively low maintenance requirements.
Bear in mind that not every plant will thrive under these conditions; conducting thorough research on which ones do can save you from disappointment down the line.
Maintaining Ideal Growing Conditions
A critical aspect of successful hydroponics involves maintaining optimal growing conditions such as light exposure, temperature control, nutrient supply, and pH balance. Understanding each plant’s specific needs goes a long way toward ensuring healthy growth.
Paying attention to seemingly minor details like lighting hours per day or ideal temperatures might seem tedious, but they significantly impact your crop’s health and yield potential.
Nutrient Management Is Key
In traditional soil gardening, nutrients come naturally from organic matter decomposition, while in hydroponics, we need to provide them directly through nutrient solutions tailored specifically for our chosen crops’ needs. “The Importance Of Nutrients In Hydroponics” offers an extensive guide on creating balanced nutrient solutions based on specific crop requirements.
An important part of managing nutrients includes regular testing of solution pH levels since drastic changes might lead to nutrient lockout, preventing plants from absorbing essential elements properly.
Cleanliness And Pest Control Are Essential
To prevent disease or pest infestation, keeping your system clean is paramount; remember that prevention always beats cure when dealing with these issues. Regularly inspecting your plants helps detect early signs before they become serious problems, leading to potentially devastating losses if left unchecked. “Preventing Pests In Hydro Systems” provides valuable information on this topic.
Key Takeaway:
Hydroponic gardening requires careful plant selection, optimal growing conditions, nutrient management, and cleanliness for success. Remember to choose plants that thrive in water-based environments like watercress or lettuce. Maintain ideal light exposure, temperature control, nutrient supply and pH balance while keeping your system clean to prevent disease or pest infestation.
FAQs in Relation to How to Grow Watercress Without Soil
How do you grow watercress seeds without soil?
You can cultivate watercress seeds hydroponically by sowing them 1 cm deep in a container with drainage holes, placed over another vessel filled with fresh water.
How do you grow garden cress without soil?
Garden cress thrives in hydroponic systems. Start by placing the seeds on a wet cotton pad or rockwool cube and keep it moist until germination occurs.
Can watercress grow in water?
Absolutely, as an aquatic plant, watercress naturally grows near streams and rivers. It can thrive when grown directly in clean, nutrient-rich standing or flowing waters.
Can I grow watercress seeds in water?
Certainly. Water is ideal for sprouting your seeds. Place them into a shallow dish of clean mineral-rich waters and they will germinate within days.
Conclusion
Growing watercress without soil is not only possible, it’s also quite advantageous.
Hydroponics offers a hands-off approach to cultivating this superfood right in your home.
You’ve learned that whether you start from cuttings or seeds, the key lies in recreating the ideal environment for growth.
Fresh water, sunlight, and temperature control are all vital components of successful hydroponic gardening.
Caring for your plants involves vigilance against pests and timely harvesting once they’re ready after 15-20 days from seeding.
But don’t stop at just growing watercress!
The world of hydroponics opens up possibilities for other organic vegetables as well – think chives, peppermint, or wintergreen as companion plants.
Your harvested garden cresses can be used creatively in salads, soups, or sandwiches, adding a nutritious punch to your meals.
This journey doesn’t end here though; there’s so much more to explore within the realm of soilless gardening!
Exploring the Best Outdoor Grow Tents for Hydroponics
Outdoor grow tents can be a game-changer for gardening enthusiasts.
The struggle is real when it comes to optimizing plant growth in less-than-ideal conditions outdoors.
Enter the world of Best Outdoor Grow Tents. They’re your ticket to creating an ideal, controlled environment for your plants right at home.
You might be thinking – “I have no idea how to choose or use one.” But that’s what separates casual gardeners from serious indoor growers. No need to fret – we have the answers you seek!
Table of Contents:
- The Benefits of Grow Tents for Indoor Gardening
- Understanding Different Types of Grow Tents
- Key Features to Look For in a Perfect Grow Tent
- The Role of Reflective Materials in Enhancing Plant Growth
- Size Matters – Choosing Your Perfect Size Tent
- Growing Cannabis in Indoor Tents
- The Pros and Cons of DIY vs Purchased Tents
- Getting Started with Hydroponics – A Beginnera€™s Guide
- The Future of Indoor Gardening – Multi-Chamber Tents
- FAQs in Relation to Outdoor Grow Tents
- Conclusion
The Benefits of Grow Tents for Indoor Gardening
Urbanites, particularly, have been embracing indoor gardening as of late. But it’s not without its challenges – think limited space and less-than-ideal plant hardiness zones.
This is where grow tents come in. These specially designed structures offer a controlled environment that allows plants to thrive indoors, regardless of outdoor conditions.
Grow tents, like Vivosun Two-in-One Grow Tent with separate chambers for different stages of growth provide flexibility and efficiency when managing various types of plants simultaneously.
Tackling Space Constraints
Grow tents are an excellent solution to space constraints common in urban settings. They make efficient use of available indoor spaces by enabling vertical farming – cultivating more plants within a smaller area compared to traditional horizontal farming techniques.
Most grow tent designs even incorporate built-in features such as trellis systems or hanging bars that support this type of cultivation, making them a perfect fit for small scale growers who want maximize their yield – despite having restricted growing areas at disposal .
Bypassing Hardiness Zone Limitations
A significant advantage offered by using an indoor grow tent is overcoming the hardiness zone limitations inherent in outdoor gardens – due to geographical location or climate variations. If you live in an area where certain crops cannot survive outdoors because it’s too cold or hot most times during their growth period, then investing in a good-quality grow tent could be the answer.
Promoting Better Crop Yield and Quality
Gardening within a controlled setting provided by these innovative structures also leads to improved yield quality produce – another reason why many garden enthusiasts prefer them. By adjusting lighting schedules and nutrient feedings based upon each individual plant’s requirements we’re able to maximize the potential of every single seedling grown under our care. Thus resulting in healthier, stronger mature specimens ready to harvest sooner than ever before – thanks to precise management of factors affecting their development throughout the life cycle from germination to maturity and the harvesting stage itself. This ultimately provides optimal control over the entire process – enhancing overall crop output while ensuring top-notch produce quality time after time. So if you’re looking create ideal microclimate your beloved greens consider adding one (or two) of these handy tools as soon as possible. You won’t regret it!
Key Takeaway:
Grow tents are a game-changer for indoor gardening, especially in urban settings. They tackle space constraints with vertical farming techniques and bypass hardiness zone limitations due to climate variations. With precise control over lighting and nutrients, they boost crop yield and quality significantly – making them an essential tool for any green thumbed gardener.
Understanding Different Types of Grow Tents
The vast hydroponic market offers a variety of grow tents tailored to different requirements and preferences. From tiny ones for cramped spaces to cost-effective iPower options, all the way up to top-tier Gorilla or Vivosun models providing superior quality. With options ranging from small grow tent models for compact spaces to budget iPower grow tent offerings for those watching their wallet, up to premium tents like Gorilla or Vivosun that bring superior quality.
In essence, choosing an appropriate size tent goes beyond just considering the available space; it’s about creating the perfect environment where your plants can thrive.
Best Overall – Vivosun Grow Tent
VIVOSUN has made its mark in the hydroponics industry by offering durable yet affordable solutions. Their multi-size range ensures every gardener finds something tailored perfectly to fit standard seedling trays as well as mature flowering plants.
A standout feature is their heavy-duty zippers which ensure light-proofing, thus maintaining optimal conditions inside regardless of external factors.
This makes them ideal not only for growing hemp but also for other plant varieties requiring controlled environments. VIVOSUN Grow Tents on Amazon.com
Best Budget – iPower Grow Tent
iPower offers excellent value-for-money choices without compromising on functionality or durability. These budget-friendly options are built around sturdy steel frames ensuring longevity while being simple enough for even beginners to assemble effortlessly.
The quick tool-free installation process, coupled with affordability, makes these tents popular among novice growers who might be testing the waters before investing heavily into equipment. iPower Budget Options at Amazon.com
BEST SPLURGE – AC Infinity Advance GROW SYSTEM
If you’re willing to invest a bit more to achieve the best possible results, then the AC Infinity Advanced System is well worth considering. This upscale option comes packed with advanced features such as a smart climate control system, allowing precise regulation of temperature and humidity levels, thereby providing the perfect environment for year-round growth irrespective of weather patterns outside.
This upscale option comes with accessories such as carbon filters and inline fans, eliminating the need to purchase them separately and saving effort in the long term, making it a sound investment for both serious hobbyists and professional growers. AC INFINITY ADVANCE GROW SYSTEM AT AMAZON.COM
Key Takeaway:
From compact and budget-friendly iPower grow tents to premium options like VIVOSUN and AC Infinity Advanced System, there’s a hydroponic tent for every gardener. Remember, it’s not just about fitting into your space; it’s about creating an ideal environment where plants can flourish.
Key Features to Look For in a Perfect Grow Tent
For those wanting to enter the world of hydroponics, it’s important to know what constitutes an ideal grow tent as this is where your plants will live most of their life cycle.
Investigating some of the essential characteristics, that can make or break your indoor gardening experience, is necessary.
The Importance of Light Proofing
In nature, plants rely on predictable day and night cycles for growth. Indoor growers must replicate these conditions as closely as possible inside their tents. This is why light proofing becomes critical when choosing the perfect grow tent.
A top-notch indoor grow tent should be equipped with heavy-duty zippers and superior material capable of preventing any unwanted light leakage from disrupting plant sleep patterns – something premium brands like Gorilla Grow Tents are known for providing.
Fresh Air Access: The Role Of Exchange Ports
Your green friends need fresh air just like us. Therefore, having multiple exchange ports within your chosen enclosure, allows easy access for fresh air, while expelling stale air – ensuring an optimal growing environment within the confined space.
Durable Frames And Heavy-Duty Zippers Matter Too
No matter how great other features may seem, if structural integrity isn’t up to par, then they’re virtually useless. You want sturdy frames (preferably metal) supporting not only weighty equipment, such as grow lights, but also enduring wear-and-tear over time without falling apart.
A good example would be Vivosun multi-chamber grow tents – featuring robust steel poles designed specifically keeping durability in mind, alongside equally resilient zippers, meant to withstand frequent use.
Maintaining Ideal Climate With Control Capabilities
Gardening indoors gives you unprecedented control over environmental factors affecting plant health, making climate control capabilities an invaluable feature to have inside enclosures. Many high-end models come with built-in ventilation systems and adjustable ducts, allowing temperature and humidity adjustments based on individual needs for different types of flowering plants and veggies.
Leveraging Automation Possibilities To Simplify Tasks
Last, but certainly not least, the automation possibilities offered by modern-day tents cannot be overlooked. These smart technologies allow automated scheduling, watering, and lighting changes, freeing up precious time to focus on other important aspects of horticulture practice. Premium options like Vivosun two-one-grow-tent incorporate these cutting-edge solutions, helping create controlled and efficient spaces that cater to varying stages of growth simultaneously.
Key Takeaway:
In the realm of hydroponic gardening, an ideal grow tent should offer light-proofing to mimic natural day-night cycles, multiple exchange ports for fresh air access, sturdy frames and durable zippers for longevity. Additionally, climate control capabilities and automation features can significantly enhance your indoor horticulture experience.
The Role of Reflective Materials in Enhancing Plant Growth
Reflective materials are a secret weapon for indoor growers. They’re the unsung heroes that can make or break your yield, especially when you’re working with limited grow lights.
Mylar is one such reflective material commonly used inside grow tents due to its impressive ability to reflect up to 98% of light. This means almost all the light from your lamps gets bounced back onto your plants, making every bit count.
Why Light Reflection Matters
In an outdoor garden scenario, sunlight comes at plants from all angles throughout the day. But within a confined space like an indoor tent? Not so much.
Your precious rays come mainly from above and, without intervention, would leave lower leaves starved for lights. Enter reflective materials – they help bounce this valuable resource around ensuring even distribution across all parts of each plant.
Better Light Distribution Equals Healthier Plants
More evenly distributed lighting encourages photosynthesis – where plants convert light into chemical energy needed for growth and development. With more effective utilization of available light sources, you get healthier flowering plants or vegetable crops producing better yields.
Size Matters – Choosing Your Perfect Size Tent
Selecting the right size grow tent is no small feat. Making the right selection for your grow tent is an essential step that could either make or ruin your indoor gardening experience, so it’s important to take this decision seriously.
To help you navigate this important choice, here are some key considerations for picking out the perfect fit for your needs:
The Compact Option: Small Grow Tents
If space is at a premium in your home, or if you’re just dipping your toes into hydroponics with only a few plants, then small grow tents, like those offered by TopoGrow, might be exactly what you need. These neat little packages can slip seamlessly into any corner of an apartment without causing too much disruption.
However, while these compact solutions may seem ideal on paper (or screen), remember that they come with their own set of challenges – namely limited room for plant growth and fewer options when it comes to equipment placement.
A Step Up: Medium-Sized Tents
Moving up from our initial option brings us to medium-sized tents which offer more growing real estate than their smaller counterparts but still manage to maintain relative portability. Brands such as Vivosun provide excellent mid-range choices offering enough space for several mature plants along with necessary accessories like lights and climate control systems.
In terms of utility consumption though; larger sizes do demand increased energy due to enhanced lighting requirements – something worth considering before making final decisions based upon physical footprint alone.
Go Big Or Go Home: Large Indoor Gardening Tents
If commercial scale cultivation appeals, or perhaps simply wanting vast expanses where diverse crops can flourish under controlled conditions, a large setup could very well tick all boxes. For instance, the UltraYield 10′ x 10′ Grow Tent offers plenty room – accommodating rows of various species. Smultaneously providing flexibility managing different types concurrently within a single unit.
Bear in mind however, that whilst bigger often equates better in the world of outdoor farming, the indoor scenario presents unique challenges – including higher maintenance demands, regular monitoring ensuring optimum health across entire crop population. All factors requiring careful consideration during selection process. Think about tailoring your choicds to specific needs and constraints rather than blindly going for the biggest option available. It’s wiser to choose with regard to specific requirements – whether thats nurturing a herb garden indoors using minimal resources, or cultivating flowering varieties demanding high light levels. All are achievable given the correct environment hence the importance of choosing an appropriately sized tent – meeting individual crop needs and so effectively contributing to the overall success of your soilless agriculture.
Key Takeaway:
When it comes to choosing a grow tent, size does matter. Whether you’re just starting out with hydroponics or scaling up your indoor garden, consider space availability and plant growth needs. From compact options like TopoGrow’s small tents for beginners, Vivosun’s medium-sized ones offering more room and utility consumption considerations, to UltraYield’s large tents for commercial scale cultivation – there is a perfect fit for every gardener’s specific requirements in the world of soilless agriculture.
Growing Cannabis in Indoor Tents
Indoor tents have become a go-to for cannabis growers, as they provide the ideal environment to ensure successful cultivation. They offer an ideal controlled environment that is essential for the successful growth of this particular plant.
If you’re planning on growing your own cannabis plants inside a tent, here are some key points to keep in mind:
The Significance of Odor Control When Growing Cannabis Indoors
Cannabis has a distinct aroma which can be quite strong when grown indoors. While some growers may appreciate the scent, others might find it overwhelming or problematic if discretion is needed.
Luckily most top-tier grow tents come equipped with ventilation systems designed specifically for odor management. These usually include activated carbon filters that effectively neutralize odors before they leave the tent area. It’s crucial to regularly maintain these filters so they continue working efficiently throughout your entire cultivation cycle. Learn more about how carbon filters work here.
Selecting The Right Grow Lights For Your Cannabis Plants
A critical aspect when cultivating cannabis indoors involves choosing appropriate grow lights. Different stages of growth require varying light spectrums; vegetative stage prefers blue spectrum while flowering stage favors red spectrum.
HID lamps offer a full-spectrum of light for both stages, but they use more energy than other alternatives like LEDs. LEDs are much more energy-efficient and produce less heat making them perfect choices especially if space within your small-sized tent is limited.
Picking Out The Perfect Size Tent For Your Indoor Garden
Your choice regarding size should depend on several factors including number of plants you’re planning on growing and available space at home. A small 2×2 foot tent could accommodate one large plant or four smaller ones whereas larger 10×10 foot options could house up-to fifty plants depending upon their size during maturity phase. Always factor in additional equipment required inside your setup like fans, humidifiers among others before settling down onto final dimensions. Here’s HOW TO CHOOSE THE RIGHT SIZE GROW TENT FOR YOUR NEEDS.
Key Takeaway:
Indoor cannabis cultivation requires a controlled environment, which grow tents provide. Odor control is crucial for discretion, and most high-quality tents include ventilation systems with carbon filters to neutralize odors. Selecting the right lights—like energy-efficient LEDs—is essential for different growth stages. Finally, tent size depends on your plant quantity and home space availability.
The Pros and Cons of DIY vs Purchased Tents
Embarking on the journey of indoor gardening brings with it a multitude of decisions. One such decision is whether to construct your own grow tent or invest in ready-made options like Gorilla or Vivosun grow tents. Exploring the pros and cons of both ready-made and DIY grow tents, we’ll evaluate which is best suited for your needs.
Diving Into DIY Grow Tents: The Good & Not-So-Good
Creating your very own custom-built grow tent can be cost-effective as you’re able to repurpose materials already at hand, making this an attractive option for budget-conscious gardeners. Moreover, crafting from scratch allows you complete control over design specifics tailored perfectly fit standard seedling trays along with other needs specific to plants inside.
However, there’s also another side to consider – time investment required for building plus sourcing quality components including heavy-duty zippers could prove daunting tasks even for seasoned do-it-yourself enthusiasts.
Purchased Grow Tents: Advantages & Disadvantages
In contrast purchasing pre-assembled tents comes packed full benefits starting right out-of-the-box experience that includes all essential features – light-proofing material air exchange ports sturdy frames etc., creating perfect environment plant growth without any additional effort involved.
This convenience extends beyond just basic necessities too especially when considering premium offerings such as those by iPower available Amazon these often come equipped advanced climate control capabilities enhancing overall growing conditions significantly.
The main downside associated purchased versions however lies within financial commitment particularly if opting high-end models brands like Gorilla Vivosun but given durability advanced functionalities many growers find them worth every penny invested.
Making Your Decision
Your final choice between constructing customized version versus buying off-shelf will largely depend upon personal preferences alongside considerations about availability time resources against monetary constraints.
If enjoy working with tools, relish the idea of crafting something uniquely yours – while having ample free time – then going down DIY path may suit best On other hand, if you prefer saving effort and like the value added benefits offered by professional-grade products, then investing in premade would likely serve better – producing an end result for optimal space where your produce will thrive.
Key Takeaway:
When it comes to indoor gardening, the choice between DIY and purchased grow tents boils down to personal preference, time availability, and budget. While DIY options offer cost-effectiveness and customization, ready-made tents like Gorilla or Vivosun provide convenience with their advanced features.
Getting Started with Hydroponics – A Beginner’s Guide
Beginning hydroponic gardening can seem daunting to those just starting out. Fortunately, there are a variety of helpful resources and tools available to make getting started with hydroponic gardening simpler. One such tool is the Mars Hydro Grow Plant Kit, designed specifically for those just starting out in this fascinating field.
In essence, these comprehensive kits like Mars Hydro make it easier than ever before to start your journey into hydroponics.
Gorilla Clone Tents: Perfect For Beginners?
Besides complete sets like Mars Hydro’s offering, another viable option exists in Gorilla Clone Tent. These tents have been tailored perfectly fit standard seedling trays which makes them ideal choices if you’re looking forward towards learning about plant growth stages right from germination up until maturity stage while also managing environmental factors within your tent effectively.
The Future of Indoor Gardening – Multi-Chamber Tents
As hydroponic gardening continues to evolve, what does the future hold for indoor growers? One exciting development is multi-chamber grow tents like Vivosun Two-in-One Grow Tent. These innovative products provide flexibility and efficiency by allowing gardeners to manage different types of plants simultaneously at various stages of growth.
In essence, these versatile tools can significantly enhance productivity in your indoor garden while maintaining quality control over each plant’s growing conditions.
Elevating Productivity with Multiple Chambers
Beyond just accommodating diverse plants, there are specific ways multi-chambers elevate productivity:
- Able to cultivate seedlings in one chamber while mature flowering plants thrive separately (50% increase in production).
- Maintaining optimal light exposure across chambers using reflective materials such as Mylar (40% better utilization).
- Potential for continuous crop cycles leading to year-round harvests (30% more yield).
Navigating Challenges with Multi-Chambers
Surely enough, operating a multi-chamber tent isn’t without its challenges. For instance:
You may need additional equipment such as extra fans or lights depending on the needs of your specific plants inside each compartment.
Varying amounts of nutrients and water might be required based on what stage your particular set of flowers or vegetables are at.
Finding Your Perfect Size Tent With Multi-Chambers
If you’re considering venturing into this new era featuring premium tents equipped with separate compartments – remember success starts from choosing quality equipment designed specifically for this purpose. You’ll want something sturdy yet flexible; capable enough even under demanding usage conditions but still perfectly fitting standard seedling trays. Remember: size matters when it comes down selecting perfect environment where all those lovely greens will call home.
This innovation indeed signifies an exhilarating step forward towards creating efficient spaces where our beloved green friends can flourish.
Key Takeaway:
Embrace the future of hydroponic gardening with multi-chamber grow tents like Vivosun Two-in-One. They boost productivity, maintain quality control and allow for year-round harvests. However, they require careful management and selection to ensure success in your indoor garden’s diverse needs.
FAQs For Outdoor Grow Tents
What is the best quality grow tent?
The Vivosun Grow Tent stands out for its high-quality materials, sturdy construction, and versatile size options.
Can grow tents be used outdoors?
Grow tents are primarily designed for indoor use. However, they can be used outdoors in a protected area with suitable weather conditions.
Does grow tent quality matter?
Absolutely. Quality affects durability, light proofing, air exchange efficiency, and overall plant growth performance inside the tent.
What is the ideal environment for a grow tent?
An ideal environment includes controlled temperature and humidity levels, a proper ventilation system, and adequate lighting to promote healthy plant growth.
Conclusion
Grow tents are your secret weapon in indoor gardening.
Their myriad benefits make them an essential tool for anyone serious about plant cultivation at home.
Different types, from budget-friendly to premium options, cater to every gardener’s needs and preferences.
Key features like light proofing, sturdy frames, and climate control capabilities contribute significantly to creating a perfect environment for plant growth.
Reflective materials inside the tent ensure all plants get enough light exposure leading to healthy flowering plants.
Your choice of size should be guided by factors such as the number of plants you plan on cultivating and available space.
In terms of growing cannabis indoors or starting with hydroponics as a beginner, grow tents provide the ideal controlled environment needed.
Even when considering DIY versus purchased tents or exploring future trends like multi-chamber tents – Best Outdoor Grow Tents have got you covered.
Ready to take your indoor gardening game up a notch? Dive into the world of hydroponics with Soilless Growers! Explore our range of top-notch outdoor grow tents that will revolutionize how you cultivate your favorite crops right at home. Let’s bring out the green thumb in you!
How To Choose A Hydroponic Pump
Venturing into the realm of hydroponics for the first time can be like sailing in unfamiliar seas, leaving one feeling overwhelmed. But hey, this is what separates an amateur gardener from a true hydroponics enthusiast.
If you don’t know how to pick the right pump that suits your system best, reaching optimal plant growth might seem like an uphill battle.
Selecting a great hydroponic pump isn’t easy folks – but let me tell you something…
Your ability to choose correctly plays a crucial role in ensuring constant circulation of nutrient-rich water in your system. And without this? Your plants simply won’t thrive as they should.
Table of Contents:
- The Basics of Hydroponic Pumps
- Choosing Between Submersible and Inline Pumps
- Evaluating Gallons Per Hour (GPH)
- Ensuring Constant Circulation of Nutrient-Rich Water
- Selecting Pumps for Different Hydroponic Systems
- Troubleshooting Common Pump Issues
- FAQs in Relation to How to Choose a Hydroponic Pump
- Conclusion
The Basics of Hydroponic Pumps
The pump is integral to the functioning of a hydroponic system, providing circulation of nutrient-rich water throughout your setup, ensuring that every plant gets its fair share of nutrients.
In essence, these pumps keep the nutrient solution constantly circulating within your system. This not only helps maintain high oxygen levels but also importantly prevents harmful bacterial growth due to stagnation.
Submersible Pumps: The Underwater Workhorse
If you’ve ever wondered what keeps things moving smoothly beneath the surface in smaller systems or sump tanks – meet submersible pumps. These devices operate underwater and are known for their quiet operation thanks to being submerged which dampens noise vibrations effectively.
Besides their compact size making them ideal for small-scale setups, they’re also less likely than some other types of pumps to generate excessive heat – this matters because too much warmth can harm delicate roots or encourage unwanted algae proliferation within your precious nutrient reservoir.
Inline Pumps: Powering Large-Scale Operations
Moving on from our under water friends we have inline pumps; these work outside yet directly connected via tubing or pipes leading into it from either end (inlet/outlet). Unlike submersibles which push fluid up through pressure differences created by impeller rotation; inline models pull liquid towards themselves before pushing out again under pressure – hence why they’re sometimes referred colloquially as ‘pull-push’ machines.
A major advantage here lies with power: Inline units generally offer more pumping capacity compared with equivalent-sized submersibles making them better suited for larger operations requiring higher volumes circulated over greater distances against gravity’s downward tug.
Choosing Between Submersible and Inline Pumps
The type you select is instrumental in maintaining an optimal water level and ensuring smooth operation within your system.
Submersible Pumps: A Perfect Match for Small-Scale Systems?
For small-scale or hobbyist systems, submersible pumps may be the best choice. These devices operate fully submerged in nutrient-rich water inside the reservoir itself.
Their primary function is to push this vital solution up through delivery tubes to nourish plants effectively. Plus points include their affordability as well as ease-of-use – making them popular among beginner growers.
- An affordable option that won’t break the bank (a big plus point if budgeting is key).
- Straightforward usage which means less time spent figuring out complex instructions.
Inline Pumps: Power Players Suited for Large-Scale Operations
Inline pumps are designed with power capacity at its core. Located outside rather than inside, these external players pull instead of pushing water from one location to another. This makes them ideal when dealing with large volumes across expansive systems – think commercial setups.
With no risk attached regarding overheating issues due to non-immersion, it’s clear why these powerful performers are often chosen by professional growers.
Deciding between a submersible or inline model? Consider factors such as operational size along with specific requirements related to maintaining optimum levels during functioning hours.
If it’s smaller home-based arrangements we’re talking about where circulation demands aren’t too high, then perhaps going down cost-effective routes via selecting a reliable submersible would suffice.
On the other hand, though, if larger commercial spaces requiring robust pumping actions come into play, investment towards acquiring sturdy inline variants could prove beneficial long-term-wise.
Key Takeaway:
When choosing a hydroponic pump, consider the scale of your operation. Submersible pumps are affordable and easy to use, perfect for small-scale systems or hobbyists. For larger commercial setups requiring robust pumping actions, opt for powerful inline pumps that can handle large volumes efficiently.
Evaluating Gallons Per Hour (GPH)
GPH is a metric of importance when selecting the right hydroponic pump, as it provides an indication of how much water can be moved in one hour under ideal conditions.
This might seem like just another number on the spec sheet but let me assure you – understanding and correctly evaluating this figure is crucial for efficient operation of your hydroponics system.
Determining Your System’s GPH Requirements
The first step towards selecting a suitable pump based on its rated GPH involves determining what exactly are your system requirements? This depends largely upon two things: The volume of nutrient-rich solution within your nutrient reservoir and desired circulation frequency. Hydroponic Flow Rate: A Key To Optimized Growth, provides further insights into striking this balance effectively.
The rule-of-thumb here says aim for a pump capable of circulating all liquid in the reservoir at least once every two hours. But remember: individual plant species’ needs along with overall system considerations, should always be factored into decisions around choosing potential hydroponic pumps.
Gallons Per Hour And Pump Efficiency
It’s easy to think more is better when we talk about flow rate measured as gallons per hour. However, there are a few caveats worth considering before jumping onto the high-GPH bandwagon.
Firstly, operating near their maximum capacity isn’t ideal for most machines including our humble water pumps; they tend not to be as efficient or durable over time compared with those working well within their range.
Secondly, a slower but steady circulation ensures plants get adequate access without overwhelming them or wasting resources. Therefore, you may want to opt for an oversized unit and use an external controller. This allows flexibility while also ensuring a longer life expectancy by reducing strain on the motor itself.
Key Takeaway:
Don’t get swept away by the high-GPH hype. Choosing a hydroponic pump is all about balance. Consider your system’s specific needs and aim for steady circulation rather than max capacity, ensuring plant health without wasting resources or straining your pump.
Ensuring Constant Circulation of Nutrient-Rich Water
Achieving a successful hydroponic system can seem challenging, but the key lies in ensuring constant circulation of nutrient-rich water. Your chosen pump plays an integral role here by providing plants with consistent access to essential nutrients.
Let’s delve into how you can ensure smooth operation within your hydroponics system and overcome common issues related to inadequate pumping capacity or frequent clogging problems.
Maintaining Optimal Water Level
The first step is maintaining an optimal water level across all growth stages. This allows plants to effectively absorb necessary nutrients while avoiding potential drowning or drying out due to insufficient water supply.
In systems like Deep Water Culture (DWC), where roots are constantly submerged in the nutrient solution, pumps play a crucial role by oxygenating the water and preventing root suffocation. Ensuring that your pump maintains this optimal level consistently becomes critical for success.
Pump Capacity: A Key Factor
Your selected pump’s capacity significantly impacts its ability to circulate nutrient-rich water efficiently throughout your entire setup. Pump capacity typically measures as gallons per hour (GPH).
If you’re running larger systems with multiple grow beds or channels, high-capacity pumps capable of moving large volumes at once without overworking themselves become indispensable. On the other hand, smaller setups may only require lower-capacity models – so understanding what suits best based on size and type of your hydroponics setup is vital.
Keeping Pumps In Good Working Condition
To keep things flowing smoothly within your system, it’s important that regular maintenance checks be performed, especially when dealing with submersible pumps which work under more challenging conditions being underwater most times.
Routine cleaning helps prevent debris build-up inside pipes, whilest timely repairs fix any mechanical problems before they escalate – disrupting overall operation. Remember – keeping everything functioning optimally not only prolongs lifespan but also enhances performance, ensuring efficient circulation throughout.
Key Takeaway:
Choosing the right hydroponic pump is a crucial step in maintaining a successful system. It’s about ensuring constant nutrient-rich water circulation, keeping an optimal water level, understanding your setup’s size to select the correct pump capacity, and performing regular maintenance for smooth operation.
Selecting Pumps for Different Hydroponic Systems
When it comes to hydroponics, the system you’re using can significantly impact your pump selection. Whether you’re operating a deep water culture or an ebb and flow setup, each has its unique requirements that need addressing.
Choosing Pumps For Deep Water Culture Systems
In Deep Water Culture (DWC), plants are submerged directly in nutrient-rich solution. This method requires high levels of oxygenation to prevent root rot and ensure healthy plant growth.
This is done by pushing bubbles through an airstone placed at the bottom of your reservoir. The result? A constant stream of oxygenated nutrient solution that keeps roots thriving.
To select an appropriate air pump for this setup, consider factors like tank size and number of airstones required – larger tanks will require more powerful air pumps capable of delivering sufficient amounts throughout all areas within them. Your choice here could mean the difference between flourishing crops versus struggling ones.
Selecting Pumps For Ebb And Flow Systems
Ebb and flow systems work differently from DWC setups; they flood trays with a nutrient-rich solution before draining back into sump tanks periodically throughout the day, ensuring timely flooding is an essential part of their operation cycle. Hence, the correct pump is a crucial component in such a scenario.
“You must calculate how many gallons per minute (GPM) your chosen pump should deliver.”
The goal is to fill up the grow tray within desired time intervals, usually around 15 minutes or less, depending upon specific crop needs. If you need 20 gallons filled in just ten minutes, then ideally seek out a pump rated around two GPH output capacity. Alongside, also bear in mind that the drain return rate is a critical aspect too. Any overflow issues during operations could spell disaster for the entire project, so always check whether the selected inline submersible hydroponic pump is able to handle both tasks efficiently prior to finalizing purchase decisions (source).
Key Takeaway:
Choosing the right hydroponic pump hinges on your system type. Deep Water Culture systems demand air pumps that provide high oxygenation, with power depending on tank size and airstone count. For Ebb and Flow setups, consider a pump’s gallons per minute output to ensure timely flooding without overflow issues.
Troubleshooting Common Pump Issues
Hydroponic water pumps are the heart of your hydroponics system, constantly circulating nutrient solution to keep plants thriving. But like any machinery, they may experience difficulties.
The two most common issues you might face with your hydroponic pump include inadequate pumping capacity and frequent clogging. Let’s delve into these challenges and explore practical solutions that ensure smooth operation within your soilless growing environment.
Inadequate Pumping Capacity
A pump that isn’t delivering enough power is a clear sign it may not be up to par for the demands of your system. This could stem from incorrect sizing or an increase in the water volume over time in your nutrient reservoir.
If you observe inconsistencies in maintaining the optimal water level or irregularities in the circulation of nutrient-rich solution, this could point towards insufficient pumping capability. In such cases, re-evaluating your choice of hydroponic pump size, based on current requirements, should help rectify this issue.
Frequent Clogging Problems
Clogs are another routine challenge faced by many growers using inline pumps or submersible pumps alike within their flow systems setup. They usually occur when plant debris gets lodged inside the mechanism or due to sediment buildup from hard-water usage over time.
- Maintaining Cleanliness: To prevent clogs occurring frequently, make sure regular cleaning schedules for both types – submersible as well as inline pumps used across all setups including deep water culture ones where oxygenation levels need constant monitoring.
- Add Pre-Filters: Consider installing pre-filters which catch larger particles before reaching the main filter, this simple addition greatly reduces instances of blockage while also extending the overall lifespan significantly.
Solving Hydroponics System Challenges: An Ongoing Process
The world around us keeps evolving, and so does the technology involved with innovative cultivation techniques like those seen being utilized increasingly today – especially regarding ‘soil-less’ farming methods.
Remember, troubleshooting doesn’t mean failure, it’s part and parcel of dealing with innovation. Patience and practice, though, you’ll master the nuances eventually, turning potential stumbling blocks into stepping stones, becoming successful in nurturing healthy, thriving plants without traditional dirt-based methods.
Key Takeaway:
Don’t let your hydroponic pump be a thorn in your side. Tackle common issues like inadequate pumping capacity by re-evaluating the size of your pump. Combat clogs with regular cleaning and pre-filters to catch debris. Remember, troubleshooting is just part of the soil-less farming journey – patience and practice will turn stumbling blocks into stepping stones.
FAQs in Relation to How to Choose a Hydroponic Pump
How do I choose a hydroponic pump?
Selecting the right hydroponic pump depends on your system’s size, type, and water volume. Consider factors like pumping height requirements, gallons per hour (GPH), and constant circulation of nutrient-rich water.
What size pump do I need for my hydroponic system?
The ideal pump size is usually half the reservoir volume in gallons per hour (GPH). For ebb and flow systems, calculate GPM by dividing the number of gallons needed to flood by fill time in minutes.
What kind of water pump do I need for hydroponics?
Your choice between submersible or inline pumps depends on your system’s scale. Submersibles are suitable for small-scale hobby systems while inline pumps cater to larger operations due to their higher power capacity.
What is the difference between inline and submersible pumps in hydroponics?
In Hydroponics, submersible pumps operate underwater within the nutrient solution whereas inline ones work outside it. Inline pumps offer more power making them ideal for large-scale setups compared to smaller hobbyist-friendly submersibles.
Conclusion
Selecting the optimal hydroponic pump can significantly improve your growing experience.
The basics are simple: understand what you’re dealing with, know the types of pumps available and their roles in a system.
Sizing matters. Get it wrong and you could end up with an inefficient operation or worse – drowned plants.
Submersible versus inline? It’s all about scale and power requirements. Your choice should align with your gardening ambitions.
Pumping height is not to be overlooked either; gravity plays its part in this game too!
Gallons Per Hour (GPH) isn’t just numbers on paper, it’s how fast nutrients circulate through your system affecting plant growth directly.
Different systems have different needs. Whether deep water culture or ebb and flow, each has unique considerations when choosing a pump.
Troubleshooting is part of the journey – expect some hiccups along the way but remember every problem has a solution waiting to be found out there!
In conclusion, understanding how to choose a hydroponic pump sets you on course towards creating an efficient soilless growing environment that allows plants to thrive like never before!
10 Best Places To Buy Microgreen Seeds for Your Garden
Places to buy microgreen seeds – that’s what every budding gardener and health enthusiast wants to know.
Finding the right source for these tiny powerhouses of nutrition can be a daunting task, especially with so many options available online.
The stakes are high. You don’t want to invest your time and energy in growing microgreens only to find out the seeds you bought were subpar or even worse, genetically modified.
That’s why we’ve done the legwork for you and curated a list of 10 best places to buy microgreen seeds. This guide is here to ensure that your journey into home gardening starts on solid ground!
Table of Contents:
- Understanding Microgreens and Their Benefits
- What to Consider When Buying Microgreen Seeds
- Best Places to Buy Microgreen Seeds Online
- How To Start Growing Microgreens at Home
- Sowing Seeds: Seeding Rate And The Importance Of A Good Tray
- Tips For Successful Germination
- Exploring Popular Microgreens To Grow
- FAQs in Relation to Places to Buy Microgreen Seeds
- Conclusion
Understanding Microgreens and Their Benefits
The world of microgreens is a fascinating one. These young vegetable greens, which are somewhere between sprouts and baby leaf vegetables, have taken the culinary scene by storm.
Growing in popularity among home gardeners as well as professional chefs due to their concentrated flavor profile and nutritional content, these tiny plants can be grown using hydroponics or soilless mediums. The growth process involves planting seeds that germinate into seedlings within just one to three weeks depending on the plant species – a quick turnaround time indeed.
Beyond being speedy growers, what really sets them apart from mature counterparts is impressive nutrient density. In fact, studies show they often contain higher vitamin, mineral, and antioxidant levels.
The Growing Popularity of Microgreens
As interest grows for nutritious foods that require minimal space yet yield high returns quickly, more people are turning towards indoor gardening practices like growing microgreen crops.
This trend isn’t surprising considering the benefits associated with such cultivation methods; not only do you get fresh produce year-round regardless of outdoor weather conditions but also control over food production processes, ensuring healthier outcomes overall.
Nutritional Powerhouses
Cultivating your own crop of microgreens comes with an array of health advantages thanks to their superior nutrient profiles. Packed full of essential vitamins and minerals, these miniature greens provide up to forty times more nutrients compared to the adult versions – making them true powerhouses when incorporated regularly into meals.
Apart from this, research indicates that consuming small but mighty veggies may help reduce risk factors associated with chronic diseases like heart disease, thus adding another reason why you should consider starting to grow them at home today.
Culinary Versatility And Flavor Profile
Diversity is a key appeal factor amongst enthusiasts, ranging from flavors, textures, colors, and sizes found across different varieties, each offering a unique taste experience. The possibilities are truly endless. Whether it’s basil seeds for pesto, garnish for a pizza dish, radish to add some crunch to a salad, or red cabbage to brighten sandwich options, the choices abound.
In addition to enhancing the overall presentation of a meal, certain types like beetroot and amaranth come with vibrant red stems, further adding aesthetic appeal to the plate and providing both visual and gastronomic delight. The next time you contemplate cultivating microgreens, recall that not only are you helping your body but the environment too.
What to Consider When Buying Microgreen Seeds
The decision of buying microgreen seeds is a critical one in your hydroponic gardening journey. The quality and type of the seeds you choose have direct implications on the health and success rate of your crops.
In this era of heightened awareness about the ingredients in our food, it is imperative that we make educated choices when selecting these small dynamos for growth.
Let’s take basil seeds, for instance. These little wonders not only bring an aromatic flavor profile to dishes but also pack a punch with their nutritional value – something every home gardener would love.
Importance of Non-GMO Seeds
The world has been witnessing a surge in demand for non-genetically modified organism (non-GMO) seeds among gardeners across all levels – from hobbyists dabbling with herb seed varieties at home to professional growers supplying baby greens mix or red cabbage microgreens mixes commercially.
This shift towards non-GMOs stems largely from growing concerns over potential risks associated with genetically modified organisms on human health as well as environmental sustainability. For example, GMO plants may demonstrate improved yield or pest resistance characteristics due to genetic modifications; however they could potentially contribute negatively towards biodiversity loss while increasing dependency on pesticides over time.
Non-GMO Project serves as an excellent resource if you wish dive deeper into understanding why many prefer natural growth processes without any genetic alterations when starting their soilless gardens .
Organic vs Chemically Treated Seeds
Certified organic versus chemically treated regular seed becomes another vital point consideration purchasing process, especially when considering the delicate nature of tender shoots like those grown using basil heirloom variety packs.
A certified organic label offers assurance to consumers that the product hasn’t been exposed to synthetic fertilizers or pesticides during its production phase, unlike the counterpart which might contain traces of chemicals used to increase shelf-life but potentially could be harmful if consumed on a long-term basis. If you are considering growing nutritious microgreens for your own kitchen counter, it’s well worth investing a bit upfront to buy high-quality untreated seeds to ensure a healthier to eat crop later.
Another factor to consider when choosing a supplier is the germination rate – we want this to be as high as possible to eliminate the risk of ungerminated seeds rotting in our crop.
Key Takeaway:
Choosing quality microgreen seeds is a crucial step in hydroponic gardening. Prioritize non-GMO and organic options for health and environmental benefits. Regardless of your preference, always source from reputable suppliers to ensure successful cultivation at home.
Best Places to Buy Microgreen Seeds Online
Exploring the realm of microgreens can be overwhelming, with an abundance of choices for those who cultivate their own. To start growing these nutritious greens at home, one must first procure high-quality seeds.
It’s not just about purchasing any old seed packet off the shelf – it’s crucial that you choose from reputable suppliers who prioritize quality control measures in their production process. Let me introduce you to some top-notch online stores where you can buy your microgreen seeds with confidence.
True Leaf Market, an established name in the industry, has made its mark by providing open-pollinated and heirloom sprouting seeds that are perfect for those looking to grow unique flavors right on their kitchen counter or backyard garden. They offer a wide variety of non-GMO certified organic seeds suitable for producing flavorful and nutrient-dense microgreens such as basil, red cabbage among others.
Understanding Seed Varieties
Different types of plants produce different types of seeds; understanding these variations will help inform your buying decisions when shopping around for your next batch of microgreen seeds.
If exotic flavor profiles excite your palate, then basil seeds might be worth considering. These tiny powerhouses germinate quickly under ideal conditions, resulting in lush green foliage bursting with aromatic goodness within weeks. You could consider sourcing them from companies like True Leaf Market known for sustainable farming practices and biodiversity preservation through seed production.
On the other hand, if color and texture are equally important factors alongside taste preferences, why not try out cabbage or radish varieties? Their vibrant hues add visual appeal to dishes while crunchy textures make delightful additions to salads and sandwiches alike.
In addition, the West Coast region is renowned for stunning landscapes and also agricultural products that extend even into the small-scale gardening realm. Companies based in this area have been supplying the worldwide community with top-quality herb seeds, both regular and larger ones, since the 1980s, making them a trusted choice for many seasoned growers and beginners alike.
Remember, the key to a successful harvest lies in choosing the right kind of seeds as the first step in the process: purchase from a good quality reputed supplier mentioned above and enjoy the benefits of fresh homemade meals today.
Lastly, let us not forget the importance of having access to reliable resources when embarking on a journey towards becoming a proficient grower. Websites dedicated to microgreens have sections filled with informative articles and tutorials, helping you navigate the initial stages confidently and efficiently. So go ahead, explore the possibilities and unfold the magic of nature at your fingertips.
Key Takeaway:
When diving into the world of microgreens, it’s crucial to source high-quality seeds from reputable suppliers like True Leaf Market. Understanding seed varieties can help tailor your garden to your taste and aesthetic preferences. Remember, a successful harvest starts with the right seeds, so choose wisely.
How To Start Growing Microgreens at Home
Growing microgreens is a fantastic hobby that brings the joy of gardening indoors. Providing your family with fresh, nutrient-rich greens throughout the year can be achieved by growing microgreens at home.
Here are some key steps and considerations for growing these delicious baby plants right in your own home.
Selecting Your Microgreen Mixes
The initial move to initiate your interior garden is picking the seeds you desire to cultivate. A multitude of selections exist, each delivering its own flavor and nutrition.
A popular choice among many growers is red cabbage microgreens mix. These tiny powerhouses pack a big punch when it comes to nutrition – they’re high in vitamins C and K – while their vibrant red stems add visual appeal as well as taste to any dish they grace.
If salads or garnishes are more up your alley, consider going for something like a baby greens mix which usually includes spinach, kale, chard etc., providing diverse flavors along with being a rich source of iron, calcium, amongst other essential nutrients.
Sowing Seeds: Seeding Rate And The Importance Of A Good Tray
Seeds sown too closely can lead towards overcrowding, hindering growth, whereas those spread out too thinly might result in sparse yield.
Therefore, maintaining an optimal seeding rate plays a crucial role in ensuring successful harvests.
As a general guideline, aim to spread around 1/2 an ounce (10-12 grams) per square foot area across a moistened soilless medium within a tray, followed by gently pressing down on them without burying them deep under the surface.
Cover trays post-sowing, creating a dark environment necessary for triggering the germination process.
Once sprouts appear, gradually expose young seedlings over a several-day period, allowing adjustment to light conditions smoothly, avoiding shock leading to possible wilting and death situations later on.
Remember, the initial stages lay the foundation for determining the overall outcome, so ensure you follow the instructions carefully to achieve the desired results.
Maintaining Optimal Conditions For Growth
Microgreens prefer cooler temperatures between 60-70 degrees Fahrenheit during the active growth phase.
Heat could trigger damping-off disease (seedling death), whereas cold slows down germination, significantly impacting the total time taken from planting till the harvesting stage adversely.
Light requirements vary depending upon the species; however, most types need about six hours of daily exposure, either natural sunlight through windows or alternatively artificial sources such as LED lights specifically designed to cater to the needs of indoor gardens efficiently.
The watering schedule should be consistent, keeping the medium damp but not waterlogged, since excess moisture leads to root rot issues, hampering healthy development severely if left unchecked for long periods, causing irreversible damage and eventually resulting in failure despite your efforts initially in setting everything correctly.
Monitoring progress regularly and making adjustments whenever required, based on observations made over time, helps maintain balance effectively – increasing the chances of success considerably.
Tips For Successful Germination
Germinating microgreen seeds successfully isn’t as daunting as it may seem. With a little bit of knowledge and the right approach, you can achieve high germination rates for your nutritious greens.
Here are some key steps to ensure successful seed germination when growing microgreens at home:
Maintaining Optimal Temperature Conditions
The first step is understanding that temperature plays an integral role in the process. For optimal growth, baby greens require temperatures between 60-75°F (15-24°C).
To maintain this optimal range, especially if you’re dealing with cooler climates or seasons, consider using a heat mat around your seeding trays. This simple tool will help keep those tiny sprouts warm enough to grow into healthy mature plants.
Sowing Depth: Not Too Deep, Not Too Shallow
A crucial aspect often overlooked by novice gardeners is sowing depth, the distance from the soil’s surface where we plant our seeds. Planting too deep might prevent light access necessary for photosynthesis; conversely, planting too shallow could lead them to dry out before they root properly.
In general, most regular seeds including basil, radish, etc., should be planted about 1/8th inch (3mm) deep, just enough coverage without hindering light exposure once they start popping up above ground level.
Appropriate Watering Techniques
Your watering technique also significantly impacts how well your microgreen seeds will sprout and develop into full-fledged plants. Seeds need constant moisture but not so much that they become waterlogged, which can cause rotting and inhibit oxygen flow needed by emerging roots.
For larger seed types like sunflower or pea shoots, pre-soaking overnight helps soften their hard outer shell, enhancing a speedier germination rate, drain thoroughly after soaking, then proceed with normal seeding onto trays.
Smaller seeded varieties such as red cabbage do not typically require any pre-soaking treatment – just regular misting until emergence usually suffices here.
Once leaves emerge, switch over to the bottom-watering method, i.e., pour water directly onto the tray’s base rather than sprinkling it on the foliage itself, reducing the risk of fungal diseases while ensuring young plants receive sufficient hydration via capillary action through developing root systems.
By paying careful attention to the aforementioned tips regarding ideal temperature maintenance, accurate seeding depths, and suitable watering methods, even beginners can enjoy impressive success rates starting off their journey cultivating delicious, nutritious homegrown baby greens within the comfort of their own homes.
Key Takeaway:
Mastering microgreen germination is a breeze with the right knowledge. Keep temperatures between 60-75°F, sow seeds at an optimal depth, and use appropriate watering techniques. With these tips in your gardening toolkit, you’ll be growing nutritious greens at home in no time.
Exploring Popular Microgreens To Grow
In the realm of home gardening, certain types of microgreens have risen to popularity due to their unique flavor profiles and growth habits. Let’s delve into some favorites such as basil, red cabbage, and radish that are adored by many for their nutritional values.
Basil Microgreens
If you’re looking for an aromatic addition to your kitchen garden or plate, Basil microgreens make a great choice. Their intense flavor profile lends itself well in salads and pasta dishes while packing a nutritious punch with vitamins A, C, E, K along with essential minerals like iron and calcium.
Their growing habit is quite straightforward, requiring moderate light conditions coupled with a regular watering schedule, making it easy even if you’re just starting out on this journey.
Red Cabbage Microgreens
Moving onto another favorite among growers – Red cabbage microgreen seeds. These vibrant greens add both color and crunch, enhancing any dish they touch. But what makes these truly stand out is the peppery kick they bring, which adds depth to the overall taste experience.
The ideal temperature range lies between 60-75°F (15-24°C), hence they can be grown comfortably even in cooler regions too.
Radish Microgreens
Last, but by no means least, we have Radish micros known for adding a spicy yet refreshing twist, perfect for pairing up with sandwiches and wraps alike, giving an extra zest to every bite taken.
Just like basil, radishes also require a good amount of sunlight during the initial stages. Therefore, sowing them shallowly on the surface is recommended, ensuring a high germination rate.
These fast-growing plants take about one week from seeding until harvest time, providing quick results for those who love seeing progress rapidly.
Each variety has its own specific needs regarding lighting conditions, water requirements, etc. Research before embarking on an indoor gardening adventure may seem overwhelming at first, but remember – a successful grower was once a beginner too. With patience, practice, and the right resources, you will soon find yourself harvesting delicious crops in the comfort of your very own kitchen.
Key Takeaway:
Microgreens like basil, red cabbage, and radish are popular choices for home gardening due to their unique flavors and easy growth habits. Each requires specific light conditions and watering schedules but with patience, practice, and research you can quickly grow these nutritious greens in your own kitchen.
FAQs in Relation to Places to Buy Microgreen Seeds
Who is the best supplier for microgreens?
True Leaf Market stands out with its wide variety, high-quality seeds, and excellent customer service.
Which seed is best for microgreens?
Basil seeds are highly recommended due to their robust growth, flavorful leaves, and rich nutritional content.
What are the most nutritious microgreen seeds?
The red cabbage microgreen seeds pack a powerful punch of vitamins A, C, K, along with other essential nutrients.
What is the most sought after microgreen?
Sunflower shoots are popular among gardeners because they grow quickly and have a sweet, nutty flavor that’s perfect in salads or as a garnish.
Conclusion
Microgreens are the tiny powerhouses of nutrition that you can easily grow at home. They’re packed with flavor and vitamins, making them a favorite among gardeners and chefs alike.
The key to successful microgreen cultivation lies in choosing high-quality seeds from reputable suppliers. Remember, organic non-GMO seeds offer better health benefits and environmental safety.
We’ve explored 10 top-notch places where you can buy these magical microgreen seeds online. Each one offers a unique variety of seed options, quality assurance measures, customer service standards, pricing models, rewards programs, or discounts.
Now that you’re aware of the criteria for selecting microgreen seeds and where to get them, it’s time to start your growing journey! The process is simple enough even for beginners: select your mix of choice; sow the seeds properly; maintain optimal temperature conditions; water appropriately – then sit back as nature does its magic!
If you’re ready to embark on this rewarding journey into hydroponics with Soilless Growers – we’ve got all the resources necessary for success right here. Our website provides comprehensive guides on everything from selecting your first set of microgreen varieties through harvesting mature plants’ full-flavored goodness!
Prepare Your Hydroponic Garden for Winter: Essential Tips
Many indoor gardeners find themselves at a loss when the colder months roll in. They’re unsure of how to adapt their hydroponic systems for winter conditions.
Preparing your hydroponic garden for winter doesn’t have to be a challenge. It’s all about understanding what your plants need during these chillier times and adjusting accordingly.
No more worrying about frosty windowsills or icy drafts wreaking havoc on your precious greens. With some key knowledge and preparation, you’ll be ready to face the cold head-on!
Table of Contents:
- Embracing the Hydroponic Garden for Winter
- The Science Behind Successful Hydroponic Systems in Winter
- The Science Behind Successful Hydroponic Systems in Winter
- Easy Grow’s Top Tips For Winter-Proofing Your Hydroponics Garden
- Choosing Winter-Friendly Hydroponic Plants
- The Joy Of Harvesting Fresh Produce In Winter
- FAQs in Relation to How to Prepare Your Hydroponic Garden for Winter
- Conclusion
Embracing the Hydroponic Garden for Winter
The concept of hydroponics, a method where plants grow faster in nutrient-rich water rather than soil, may seem complex. Nevertheless, it’s not as difficult to comprehend and apply than one might anticipate.
Let’s get into how an indoor hydroponics garden can be your winter gardening solution.
Differences Between Traditional Gardening and Hydroponic Systems
In traditional gardening methods, plant roots have to navigate through soil to absorb essential nutrients. In contrast with hydroponic systems, these nutrients are directly available in the water-based medium used for growing plants – making them easily accessible without any extra effort from the plant itself.
This direct access leads to accelerated growth rates compared with conventional cultivation techniques. Studies suggest that this speedier growth rate is due largely to easy nutrient absorption within their controlled environment provided by an indoor hydro system during colder months when outdoor temperatures drop significantly below optimal levels needed for most flora to thrive outdoors.
Maintaining Your Indoor Hydro System During Winter Months: An Overview
A key advantage offered by modern-day agricultural technologies such as our beloved hydros lies within the ability to withstand harsh conditions brought on each year once frosty weather sets foot upon the landscape outside your home’s windowsill. This resilience stems primarily from the fact that, unlike open fields exposed to the elements nature throws at us day after day, your precious green friends are tucked away safely inside warm, cozy confines of a well-designed unit equipped with everything required to ensure successful crop yields throughout even the coldest times of the season.
The Science Behind Successful Hydroponic Systems in Winter
Now, let’s explore the science behind why certain types of crops excel under specific environmental circumstances better than others might otherwise do so in an open field exposed to the harsh elements nature often brings along with it every time the calendar flips over to a new page, marking the start of wintertime adventures ahead. We’ll discuss crucial factors like root zone temperature, light requirements, and nutrient solution needs for various species you choose to cultivate in the next few chilly weeks coming up soon.
Key Takeaway:
Hydroponic gardening is a practical winter solution, providing plants with direct nutrient access for faster growth. This indoor system thrives in colder months due to its resilience against harsh weather conditions and the ability to control crucial factors like root zone temperature, light requirements, and nutrient needs.
The Science Behind Successful Hydroponic Systems in Winter
Winter may be a difficult season for traditional horticulturalists, but those who have adopted hydroponics can still cultivate plants even when temperatures drop. The key lies in understanding and managing three essential elements: root zone temperature, light requirements, and nutrient solution needs.
Understanding Root Zone Temperature
A plant’s roots are its lifeline – they provide nourishment and stability. In hydroponic gardening during winter months, maintaining an optimal root zone temperature is critical. Research shows that a range between 20°C to 21°C allows efficient absorption of nutrients necessary for healthy growth.
Cold weather slows down metabolic processes within the plant which could result in stunted growth or worse – death. Monitoring this aspect of your indoor garden’s climate control is vital during winter months.
Light Requirements for Hydroponic Plants
In addition to heat management via controlling the root-zone-temperature, providing adequate lighting plays another crucial role when it comes to growing crops indoors over colder periods. Grow lights supplement natural sunlight – often scarce due to shorter days and less intense rays typical of the season – affecting overall yield quality. According to Gardening Know How,
- To maximize yield potential, it’s important to adjust the lighting setup according to the light needs of each plant. For example, cilantro, a popular choice among growers, requires approximately twelve hours of daily light for optimum results, thereby ultimately maximizing potential harvests come springtime.
- To ensure sufficient illumination throughout the day, consider using LED lamps. They offer broad-spectrum coverage to mimic nature while being energy-efficient – an added bonus considering increased use during darker winter days. Remember, though, balance remains key. Don’t go to extremes, but instead find the center point for optimal long-term outcomes.
Nutrient Solution Essentials
Your nutrient solution is pivotal in ensuring healthy development through the provision of all minerals needed without soil – in other words, cultivated via hydroponic systems. During wintertime, however, there is one more thing you must keep in mind, as discussed earlier about root zones. You see, if the nutrient concentration levels are allowed to fall too low, uptake efficiency in individual specimens might decrease, resulting in potentially subpar performance overall. A study published by HydroGarden highlights this issue extensively.
Additionally, Easy Grow recommends adding water heaters designed specifically for such setups to avoid dips below the recommended range, assuring consistent delivery of vital nutrients directly to where they are most needed – namely, the very core of the living plants themselves. This optimization increases the chances of survival, let alone thriving, under otherwise adverse circumstances.
Key Takeaway:
Brace your hydroponic garden for winter by mastering three elements: root zone temperature, light requirements, and nutrient solution. Keep roots warm to ensure efficient nutrient absorption, tailor lighting to individual plant needs using energy-efficient LEDs, and maintain optimal nutrient concentration levels in your solution.
Easy Grow’s Top Tips For Winter-Proofing Your Hydroponics Garden
But fear not, the challenges that cold weather brings to your indoor hydroponics garden are actually quite manageable.
Let’s explore Easy Grow’s top tips on how you can prepare and maintain your thriving green oasis during these colder months.
Maintaining Good Circulation in Your Grow Room
Achieving optimal grow room climate control is akin to finding yourself amongst the treetops rather than being lost in the undergrowth. So, what does this mean when it comes to handling colder outdoor temperatures?
Having a well-circulated air system as an integral part of maintaining consistent temperature and humidity levels within your growing space.
This isn’t rocket science; with strategically placed fans or ventilation systems, you’ll be able to keep warm air moving evenly throughout all areas of your indoor garden while preventing excess moisture build-up – which could lead to mold growth or other issues.
Incorporating Light & Heat Containment with Easy Grow Lightite Sheeting
To ensure effective light and heat containment, Easy Grow recommends using their innovative product – The Lightite Sheeting. This reflective sheeting material reflects both light and heat back into the growing area instead of allowing them to escape through walls and ceilings, thereby maximizing plant exposure to essential lights and contributing significantly towards energy efficiency during those chilly months when heating costs tend to rise sharply.
Tapping Into Increased Heat from Hydroponic Systems
Your hydroponic gardening setup naturally generates some amount of warmth due to lighting fixtures and electrical components. So why let it go to waste during winters? Every bit counts. Redirect the heat where needed.
Potentially channel warmer air around cooler parts of the house or living spaces where people spend most of their time, turning an otherwise wasted resource into a valuable asset for keeping cozy and comfortable all season long.
Maintaining Humidity Levels Within Ideal Range
Dryness often accompanies colder outdoor temperatures, making the maintenance of appropriate humidity levels inside critical for plant health. Especially since many species prefer higher relative humidities typical of tropical environments they originate from.
Add water via humidifiers or misters regularly to maintain the ideal conditions necessary, depending on the individual needs of each type of crop grown indoors under controlled conditions without soil (hydroponically). Remember, overdoing it might result in fungal diseases, so finding the right balance is vital here too.
Key Takeaway:
Don’t let winter chill your hydroponic garden’s vibe. Keep the air circulating, trap light and heat with reflective sheeting, harness system-generated warmth, and balance humidity levels. Remember – it’s not rocket science; just a bit of strategic planning for a thriving indoor oasis.
Choosing Winter-Friendly Hydroponic Plants
The success of your hydroponics garden in winter is largely determined by the plants you choose to grow. Certain crops are better suited for colder conditions and can flourish even when temperatures drop.
Cilantro
Also known as coriander, this is a popular herb worldwide. Cilantro thrives in cooler environments which makes it a perfect candidate for indoor hydroponics gardening during winter months. This plant requires approximately 12 hours of light per day for optimal growth and will bolt or go to seed quickly if exposed to high temperatures.
Carrots
You might not have considered carrots as suitable candidates for a hydroponic system due to their long taproots, but with careful handling, they can thrive under controlled indoor conditions. Carrots also prefer cooler climates, making them an excellent choice for your winter-friendly selection. Of course ideally you will select varieties you know are on the shorter side such as Scarlet Nantes or Chantenay.
Oregano
This hardy perennial herb withstands lower light levels often associated with shorter daylight hours in winters, making oregano an ideal choice that adds flavor while being easy on maintenance requirements within an indoor setup.
The Joy Of Harvesting Fresh Produce In Winter
Winter may be a tough period for conventional gardening, but hydroponic horticulture is an entirely different experience. The cold weather brings its share of challenges to outdoor cultivation; however, with indoor hydroponics gardening, these hurdles are easily surmountable.
By creating an indoor hydroponic garden, you can bypass the cold weather and enjoy a faster growing rate than soil-based gardens. This means even during those frosty months where nothing seems to thrive outdoors, you’re still able to enjoy fresh produce right at home.
Nurturing Your Hydroponic Garden Through Winter
Maintaining an effective indoor garden requires consistent attention throughout the entire growing process. For successful winter growth in your hydroponics setup, regular monitoring is key – especially factors like root zone temperature control and nutrient solution levels.
To ensure optimal temperatures within the system while meeting light requirements adequately using appropriate grow lights tailored specifically towards plant needs during shorter daylight hours becomes crucially important. Root zone temperature management is essential as roots function best at certain temperatures which vary depending on each specific type of plant grown.
The Reward: A Bountiful Winter Harvest
A well-maintained indoor hydroponic system rewards diligent growers with lush greenery bursting forth amidst snow-covered landscapes outside their windows. Imagine enjoying freshly picked basil leaves atop warm pasta dishes or crisp lettuce straight off its stem – all possible thanks to controlled environments provided by modern-day hydroponic systems.
If done correctly and consistently monitored over time, hydroponics makes one appreciate nature’s processes more intimately. It teaches patience, nurture, and care – all virtues we could benefit cultivating further in today’s fast-paced world. Plus, it serves as a fantastic conversation starter when guests marvel at a thriving mini-farm right inside the home.
Taking Pleasure In The Process And Outcome
Beyond yielding delicious results, the journey itself adds value too. Growing food hydroponically makes one appreciate nature’s processes more intimately. It teaches patience, nurture, and care – all virtues we could benefit cultivating further in today’s fast-paced world. Plus, it can create a fascinating hobby you can share with fellow enthusiasts.
Gardeners often find solace and tranquility tending crops, and the same applies to handling tasks involved in maintaining Hydroponic Gardening, and experiencing the thrill of harvesting their very own farm-to-table meals amidst chilling winters.
Key Takeaway:
Winter doesn’t have to mean a halt in fresh produce; with indoor hydroponic gardening, you can enjoy homegrown greens despite the frosty outdoors. It’s all about consistent monitoring and understanding your plants’ needs – from root zone temperatures to nutrient levels. The reward? A thriving mini-farm that serves as both a food source and conversation starter.
FAQs in Relation to How to Prepare Your Hydroponic Garden for Winter
How do you keep hydroponics in the winter?
Maintain optimal root zone temperature, ensure good air circulation, contain light and heat with reflective sheeting, utilize increased heat from your system, and maintain humidity levels.
Can you grow hydroponics outside in winter?
Growing hydroponics outdoors during winter can be challenging due to cold temperatures. It’s recommended to move your setup indoors or use a greenhouse for protection.
How cold is too cold for hydroponics?
The ideal root zone temperature range for most plants in a hydroponic garden is between 20°C and 21°C. Temperatures below this could harm plant growth.
What can you grow in hydroponics in cold weather?
You can successfully grow cilantro, carrots, oregano, chives, spinach, and broccoli using a well-maintained indoor hydroponic system during colder months.
Conclusion
Embracing hydroponics for winter gardening is a game-changer. It’s all about understanding the unique needs of your plants during colder months and adapting accordingly.
Root zone temperature, light requirements, nutrient solution – these are key elements to keep in mind when preparing your hydroponic garden for winter.
Proper air circulation, effective use of heat, and maintaining humidity levels can make or break your indoor growing success.
The choice of plants matters too. Cilantro, carrots, oregano – they’re just some examples of crops that thrive in an indoor setup during winter.
In essence: How To Prepare Your Hydroponic Garden For Winter doesn’t have to be daunting at all!
If you’re ready to experience the joy of harvesting fresh produce even amidst cold weather challenges outside…
Our comprehensive guide on everything related to hydroponics is here to help! Dive into more expert tips and tricks on how you can maximize your soil-free growing potential today.
Your Guide on How To Choose A Hydroponic Reservoir Size
The size of your reservoir plays a pivotal role in the success of your hydroponics setup. But where do you start?
Don’t worry, we’re here to assist in this process and help you make the best choice for your hydroponic reservoir size. With some knowledge and planning, choosing the right reservoir size doesn’t have to be overwhelming.
In fact, understanding how to choose a hydroponic reservoir size is what separates an average grower from an exceptional one. So let’s dive into it!
Table of Contents:
- The Role and Importance of Hydroponic Reservoirs
- Factors Influencing Hydroponics Reservoir Size
- Choosing Your Hydroponic System Setup With Proper Management Techniques Is Essential To Long-Term Success And Optimal Growth For Plants
- Choosing Your Hydroponics Reservoir
- Maintaining Your Hydroponics Reservoir
- Optimizing Your Hydroponic Setup with Proper Reservoir Management
- FAQs in Relation to How to Choose a Hydroponic Reservoir Size
- Conclusion
The Role and Importance of Hydroponic Reservoirs
Soluble fertilizers and water are combined in a hydroponic reservoir to form an ideal nutrient solution, making hydroponics a viable soilless method of growing plants. A crucial component in this process is the hydroponic reservoir.
This isn’t just any storage unit; it’s a meticulously designed space where your plant’s lifeline – water mixed with specific quantities of soluble fertilizers to form an ideal nutrient solution – is stored. The role played by these hydroponic reservoirs extends beyond mere storage; they are instrumental in preparing the life-sustaining concoction that feeds your greens.
Oxygenation plays another vital function performed by your hydroponics reservoir. Oxygenating the nutrient solution ensures that roots can breathe properly while submerged, a critical factor for healthy root development leading to overall optimal growth among all types including small-sized plants up till large ones.
Maintaining Nutrient Concentration & pH Levels
Successful growers know how important maintaining consistent levels within their hydroponics systems . This task requires constant monitoring which becomes possible through effective utilization of well-sized hydroponics nutrient reservoirs.
Nutrient concentrations tend to fluctuate over time due factors like evaporation or absorption by plants themselves, regularly checking these levels enables timely additions or reductions ensuring optimum ranges remain intact during each stage throughout cultivation cycles here at Soilless Growers blog platform regularly nowadays.
pH Level Management: An Overlooked Aspect?
Did you know that your hydroponic reservoir isn’t just a container for essential nutrients? It’s also a vital tool for managing the temperature of the liquid inside, which can greatly influence the success of your crops. Let’s explore how this works, and why it’s so important, whether you’re growing a small herb garden or a large volume of crops.
Temperature Control and Its Importance
Your choice of reservoir size and material type is crucial because it determines how well the temperature can be maintained within the liquid. This might seem like a minor detail, but it’s actually essential for getting optimal yields from your plants.
- For Small and Large Crops Alike: Whether you’re growing small herbs or large vegetables, maintaining the right temperature is key. Your choice of reservoir will impact how well this can be achieved.
- Deep Water Culture (DWC) Systems: If you’re using DWC systems, temperature control becomes even more critical. The roots of your plants are directly exposed to the liquid medium for most of the cultivation cycle. Cooler temperatures are often required, making the choice of reservoir vital.
Key Takeaway:
A hydroponic reservoir is more than a storage unit; it’s the heart of your soilless farming system. It holds the nutrient-rich solution that feeds your plants, helps maintain crucial pH levels and temperature control for optimal growth. So choosing its size and material type isn’t just important—it’s paramount.
Factors Influencing Hydroponics Reservoir Size
The dimensions of your hydroponic reservoir can greatly impact the overall productivity and success of your hydroponic setup. It’s not just a case of getting any sizable container and filling it with nutrient solution; several aspects need to be considered.
A primary factor is the number of plants you plan on nurturing in your system. A larger quantity will naturally require a more substantial amount, hence necessitating a larger volume for both the water source and nutrient tank. Additionally, plant size plays an integral role – small-sized plants like herbs may have lesser requirements compared to medium-sized or large plants such as tomatoes or cucumbers.
Your frequency of interaction with the system also influences how big (or small) your reservoir should be. If you’re able to check on and maintain it daily, then smaller reservoirs might suffice since resources can be replenished regularly.
Calculating Your Hydroponics Reservoir Size
When setting up a hydroponic system, one of the essential considerations is determining the right size for your reservoir. This is crucial because the reservoir holds the nutrient solution that feeds your plants. Here’s a general guideline to calculate the appropriate size for your hydroponics reservoir:
- Identify the Number of Plants: Determine how many plants you’ll be growing in your hydroponic system.
- Calculate the Water Requirement per Plant: Estimate the amount of water each plant will need. This can vary greatly depending on the type of plant and the stage of growth. As a general rule, you may consider around 1 to 2 gallons (4 to 8 liters) per plant per day.
- Factor in Extra Capacity: It’s wise to add some extra capacity to ensure that your plants never run dry. A common practice is to add an additional 10% to 20% to the total volume.
- Calculate Total Reservoir Size: Multiply the water requirement per plant by the number of plants, and then add the extra capacity.
Total Reservoir Size=(Water Requirement per Plant×Number of Plants)×(1+Extra Capacity Percentage)
- For example, if you’re growing 10 plants and each requires 1.5 gallons (5.7 liters) per day, and you want to add 20% extra capacity:
Total Reservoir Size=(1.5 gallons×10)×1.2 = 18 gallons (≈68.1 liters)
Choosing your hydroponic system setup with proper management techniques is essential to long-term success and optimal growth for plants.
Picking a suitable hydroponic system involves more than just choosing one based on capacity alone; other considerations come into play too. An important consideration is color, preferably black and opaque, to prevent algae growth that thrives with sunlight exposure in clear containers, which can compete for precious nutrients and potentially lead to stunted growth. Sturdy material is essential because leaks can lead to wasted valuable resources and potential messes around the growing area, possibly damaging surrounding equipment as well. Remember to always consider these factors when setting up your own system for the best results.
Key Takeaway:
Choosing the right hydroponic reservoir size isn’t a one-size-fits-all affair. It’s influenced by factors like plant quantity and size, maintenance frequency, and even unforeseen circumstances such as evaporation loss. Remember to factor in color and material durability too – you don’t want algae stealing your nutrients or leaks wreaking havoc.
Choosing Your Hydroponics Reservoir
Selecting an appropriate hydroponic reservoir requires more than just picking any container that can contain water and nutrients. It’s not just about picking up any container that can hold water and nutrients; there are several factors to consider.
The color of your hydroponic reservoir, for instance, plays a significant role in preventing algae growth. Algae thrive on light; hence choosing an opaque or black-colored tank helps block out sunlight and deter their proliferation. This is crucial because once established, these green invaders compete with your plants for vital resources like oxygen and nutrients.
In addition to color selection, you should also pay attention to the durability of your chosen nutrient tank. A sturdy one will prevent leaks which could lead to wastage of precious resource, your nutrient solution, and potential damage around your setup area due to its corrosive nature when left unattended over time.
Importance of Spare Reservoirs
Spare or backup reservoirs might seem unnecessary at first glance but they serve important roles in ensuring smooth operation within any well-managed hydroponics system.
A spare tank offers flexibility during changeover periods from old nutrient solutions towards fresh batches without interrupting supply flow, a critical aspect especially considering how fast some plant species consume available nutrition under optimal conditions.
- You don’t need another large-scale primary-like reserve though: Smaller units suffice provided enough capacity exists, allowing seamless transition between empty-refill cycles, thereby maintaining constant nourishment levels throughout the entire growing phases leading to healthier, more productive crops overall.
Maintaining Your Hydroponics Reservoir
Regular maintenance, including regular cleaning routines, play key roles in keeping systems running optimally in the long term.
- Cleanliness Is Key: Routine sanitation procedures help eliminate debris buildup inside tanks – reducing the chances of harmful bacterial colonies establishing themselves and causing problems down the line if unchecked.
- Frequent Checkups Are Essential: Besides physical cleanliness, routine checks ensure all components are in working order, while identifying early signs of wear and tear which could potentially require replacements before serious issues arise to negatively affect productivity.
Preventing Algae Growth in Your Reservoir
Algal blooms pose real threats to successful operations given their inherent resilience and ability to spread rapidly across entire setups if left unchecked.
- To combat this problem, remember to choose dark-colored, preferably black/opaque containers, blocking sunlight penetration and inhibiting photosynthesis, thus deterring algal growth from the start.
- In addition, always place units away from direct sunlit locations wherever feasible, further reducing exposure levels and lowering the risks of unwanted blooms occurring in later stages.
- Last but certainly not least, never underestimate the importance of frequent thorough cleanings followed by proper disinfection measures, eliminating residual spores that may be lurking behind post-initial cleanup efforts, effectively breaking the cycle of continued reproduction altogether. Thus resulting in cleaner, healthier environments conducive to excellent crop yields consistently every single harvest season.
Key Takeaway:
Choosing the right hydroponic reservoir is more than just selecting a water-holding container. Consider color, durability, and having spare units for seamless transitions. Regular maintenance and proactive measures against algae growth are also crucial to ensure healthy crops every harvest season.
Optimizing Your Hydroponic Setup with Proper Reservoir Management
The efficiency of your hydroponics system relies heavily on how well you manage your nutrient reservoir. A correctly sized tank, paired with diligent maintenance routines, can lead to better resource utilization and improved plant growth.
Essentially, the size of your tank isn’t just for holding enough water for your plants; it’s also about providing an environment that encourages their best growth.
Nutrient Solution Management
Your hydroponic nutrient solution plays a key role in determining the health and productivity of your crops. An effectively managed nutrient solution fosters ideal conditions for root development and absorption – both vital components in achieving successful harvests.
- Maintaining appropriate temperature: The ideal temperature range for the nutrient solution is 65°F – 75°F (18°C – 24°C), as this allows for sufficient oxygen levels to maintain root health and inhibit the growth of harmful pathogens. At these temperatures, oxygen levels are high enough to support root health while inhibiting harmful pathogens’ growth.
- Frequent monitoring: Regularly check pH levels within the hydroponic systems ensures optimal uptake of nutrients by plant roots. Most crops thrive at slightly acidic pH level, between 5.8 and 6.5 with some exceptions based on specific crop requirements.
- pH adjustment tools: Reliable testing tools like digital meters or litmus paper strips help monitor pH levels accurately within the nutrient solution.If necessary adjust using suitable products available commercially such as phosphoric acid (to lower) or potassium bicarbonate (to raise).
Spare Reservoirs For Nutrient Changes And Backup Purposes
Having backup reservoirs proves beneficial during routine cleaning procedures or unexpected malfunctions within primary tanks.
They allow growers continuity without disrupting critical growing cycles, a benefit especially relevant if cultivating large-scale crops over extended periods.
In addition, having spare containers allows easy changes nutrition plans mid-cycle needed, for example switching from vegetative phase nutrients flowering ones without disturbing existing solutions too much.
Multiple smaller reservoirs could increase overall water capacity without necessarily doubling space requirements, an advantage particularly useful where space constraints exist.
Managing your hydroponic system is about more than just picking the right-sized main tank. It’s about paying attention to every detail that helps maintain the best conditions inside this crucial component.
Every choice you make, from selecting and sizing the tank to how you operate it, affects your plants at every stage of their growth. This includes everything from the seedling phase all the way to maturity and harvesting.
In other words, getting things right from the start is an investment that pays off. Thoughtful and wise decisions about your tank and how you manage it will lead to better success rates across the entire cultivation process. Whether you’re a beginner or a seasoned grower, always remember that these details matter, and they contribute to a bountiful and healthy harvest.
Key Takeaway:
Don’t underestimate the power of a well-managed hydroponic reservoir. It’s not just about water storage, but creating an ideal growth environment for your plants. Regular monitoring, temperature control and backup reservoirs are key to successful harvests. Remember – good things grow where you’ve sown thoughtful effort.
FAQs in Relation to How to Choose a Hydroponic Reservoir Size
How big should my hydroponic reservoir be?
The size of your hydroponic reservoir depends on factors like the number and size of plants, their water usage, and frequency of interaction with the system. Use the formula N * W * T / 2,000 + Extra to calculate.
How big should DWC (Deep Water Culture) reservoir be?
In a Deep Water Culture system, typically allow for 1-2 gallons per plant. However, larger plants may require more space and thus a bigger reservoir.
Does container size matter for hydroponics?
Absolutely. The container’s size directly impacts how much nutrient solution it can hold, which in turn affects plant growth and health.
How many gallons does a hydroponic reservoir hold?
The capacity varies based on its size. Small home systems might use containers holding around 10-20 gallons, while commercial setups could have tanks that store hundreds or even thousands of gallons.
Conclusion
Choosing the right hydroponic reservoir size is more than just a simple calculation. Figuring out the right hydroponic tank size requires more than a simple equation; it involves comprehending your plants’ requirements and how to best meet them in an efficient way.
From grasping the role of hydroponic reservoirs to knowing what factors influence their size, it all contributes to creating an optimal environment for your plants.
The color and sturdiness of your reservoir matter too. They help prevent algae growth and leaks that could disrupt your system’s balance.
Maintaining cleanliness isn’t optional; it’s necessary for preventing debris buildup or mold formation which can harm plant health over time.
A spare reservoir? Yes! It allows easy nutrient solution changes without doubling water capacity unnecessarily. And remember: keep algae at bay with smart choices like opaque colors and strategic positioning away from direct sunlight!
Your journey into hydroponics doesn’t stop here though – there’s always room to optimize further. Ready to take on this exciting venture? Check us out at Soilless Growers. We’re dedicated to helping growers like you master soil-free cultivation methods such as Hydroponics. From choosing a suitable hydroponic reservoir size, setting up systems efficiently, maintaining them effectively – we’ve got you covered every step of the way!
How To Check The pH In Your Hydroponic Garden
Checking the pH in your hydroponic garden can seem like a daunting task, especially if you’re new to hydroponics.
The truth is, it’s an essential skill that separates the novice from the experienced gardener. Without understanding how to monitor and adjust your system’s pH levels, you may find yourself struggling with poor plant health or disappointing yields.
Fear not! Verifying the pH in your hydroponic system doesn’t have to be perplexing or worrisome.
In fact, once you’ve got the hang of it, checking the pH in your hydroponic garden will become second nature – just another part of ensuring your plants are thriving and productive!
Table of Contents:
- The Science of pH in Hydroponics
- Why PH Matters In Hydroponic Gardening
- How to Test and Adjust Your Hydroponic System’s pH Levels
- Accurate Testing Techniques For Reliable Results
- Making Necessary Adjustments To Your System’s pH Levels
- FAQs in Relation to How to Check the pH in Your Hydroponic Garden
- Conclusion
The Science of pH in Hydroponics
When it comes to hydroponic gardening, understanding the concept of pH is a must. The term ‘pH’ stands for “potential of hydrogen” and serves as an indicator that measures how acidic or alkaline (basic) a solution is.
This scale ranges from 0 – highly acidic, through 7 which represents neutral conditions like distilled water, up until 14 – extremely alkaline. Solutions with a pH below 7 are considered acidic while those above this threshold lean towards being more alkaline.
An interesting facet about the nature of this scale lies in its logarithmic structure. A nutrient solution at ph5 for instance isn’t just slightly more acid than one at ph6; instead it’s ten times so. This underlines why even seemingly small shifts on your hydroponic system’s PH meter can have substantial implications upon plant health within any given setup.
pH & EC Information For Specific Plants
Each type of crop has unique needs when it comes to optimal growing environments – including factors such as light exposure levels and temperature settings along with their preferred acidity or alkalinity level.
For example: Lettuce thrives best under slightly acidic conditions falling between pH5-pH6 whereas tomatoes prefer somewhat higher values around approximately pH5.5-pH6.5.
By leveraging scientifically established data sources like , you’ll be able tailor-make perfect growth habitats based upon individual crop preferences thereby significantly enhancing yield outcomes.
This knowledge empowers growers by allowing them create tailored setups optimizing each plant’s ability absorb nutrients effectively from surrounding environment ultimately leading better yields overall.
Why pH Matters In Hydroponic Gardening
pH levels are an essential part of a successful hydroponic garden. They directly influence how well plants can take up the nutrients they need from their surroundings.
Macronutrients like nitrogen (N), phosphorus (P), and potassium (K), secondary elements like calcium (Ca), magnesium (Mg), and sulfur (S), and micronutrients like iron (Fe), manganese (Mn), and zinc (Zn) are vital for plant growth. Plants also take up oxygen from the air and water.
The Optimal Range For Hydroponics
The ideal pH level for most hydroponic systems usually falls between pH 5 and pH 6. However, the perfect range can vary depending on the specific plants you’re growing. Some crops may thrive outside this general range.
It’s important to remember that every plant is unique, so you might need to adjust the pH levels to ensure the best nutrient absorption, healthier growth, and increased productivity.
In Conclusion
Keeping the pH levels in balance throughout the entire growing process is key to long-term success in hydroponic gardening. Since pH levels can fluctuate, constant monitoring and regular testing are essential parts of the process.
By paying close attention to pH levels and making adjustments as needed, you’ll be setting your garden up for success, ensuring that your plants have everything they need to grow strong and healthy.
Key Takeaway:
Understanding pH levels in hydroponic gardening is crucial as it affects plant health and nutrient absorption. Each crop has unique acidity or alkalinity preferences, impacting their growth habitats. Regular testing ensures optimal pH balance, promoting healthier plants and better yields.
How to Test pH in Your Hydroponic Garden
There are several methods you can use to test the pH levels in your hydroponic garden. Here are a few popular options:
1. pH Test Strips
pH test strips are a quick and easy way to check the pH levels in your hydroponic system. Simply dip the strip into the nutrient solution and compare the color change to the provided chart. Using pH test strips to check the acidity of a hydroponic system may give an overall indication, however it is not always as precise as other methods.
2. pH Test Kits
pH test kits typically include a liquid pH indicator and a color chart. You’ll need to add a few drops of the indicator to a small sample of your nutrient solution and compare the resulting color to the chart. This method offers a more precise measurement of pH levels.
3. pH Meters
pH meters are the most accurate way to measure pH levels in your hydroponic garden. These handheld devices have a probe that you insert into the nutrient solution, and they provide a digital readout of the pH level. While pH meters can be more expensive than other methods, they offer the highest level of accuracy.
Why pH Monitoring is Important
Monitoring and adjusting pH levels in your hydroponic garden is crucial for several reasons:
1. Nutrient Availability
Each nutrient has an optimal pH range at which it is most available to plants. If the pH is too far from ideal, certain nutrients may become inaccessible, resulting in nutrient shortages and stunted plant growth.
2. Nutrient Uptake
pH levels also affect the ability of plants to absorb nutrients. When the pH is not within the ideal range, nutrient uptake can be impeded, leading to reduced growth and diminished yields. This can result in stunted growth and reduced yields.
3. pH Drift
pH levels in hydroponic systems can drift over time due to various factors, such as nutrient uptake, evaporation, and microbial activity. Regularly monitoring and adjusting pH levels helps maintain a stable and optimal environment for your plants.
Conclusion
Verifying and sustaining the pH levels in your hydroponic garden is necessary for flourishing plant growth and highest yields. By using reliable testing methods and keeping pH within the optimal range, you can ensure that your plants have access to the nutrients they need for thriving in a hydroponic system.
Key Takeaway:
Keeping a keen eye on pH levels in your hydroponic garden is pivotal for plant health and yield. The ideal range sits between 5.5 and 6.5, allowing plants to optimally absorb nutrients. Use reliable testing methods like pH meters to maintain this balance and keep your green friends thriving.
How to Test and Adjust Your Hydroponic System’s pH Levels
Maintaining optimal pH levels is an essential step for successful hydroponic gardening. It’s crucial for your plants’ health and overall productivity in your garden. Tools like pH meters, litmus test strips, or liquid tests such as this liquid PH test kit from General Hydroponics can be an invaluable aid.
Accurate Testing Techniques For Reliable Results
The success of your hydroponic garden hinges on precision, especially when it comes to the pH level of your nutrient solution. It’s a vital factor that can greatly influence plant health and productivity.
To ensure accuracy in measuring this crucial parameter, you need to adopt certain testing techniques with digital pH meters or litmus test strips.
When and How Often Should You Check Your System’s pH?
The frequency of checking your system’s pH levels depends on various factors, including experience level as a gardener, type of crops grown among others.
Newbies are advised to perform daily checks while more experienced growers might find weekly checks sufficient.
Your experience as a gardener and the types of plants you’re growing largely dictate how frequently you should check your system’s pH levels. If hydroponics is new territory for you or if there have been recent changes in temperature or nutrient composition, daily checks may be necessary until conditions stabilize.
Veteran growers who’ve mastered their routines might find weekly checks sufficient enough to maintain optimal conditions within their systems. But remember: these are guidelines, not rules. Always keep an eye out for signs like yellow leaves or stunted growth; they could signal imbalances needing immediate attention.
Making Necessary Adjustments To Your System’s pH Levels
If you discover that the nutrient solution falls outside the recommended range during one of these routine check-ups, it becomes essential to make immediate adjustments but cautiously since sudden drastic changes can shock plant roots and cause potential harm.
- You may need commercial adjusters specifically designed for raising or lowering pH until the desired values are reached.
- A keen understanding of how much adjustment product to use without overdoing it will come in handy here.
Remember, it’s always better to start small and gradually increase the quantity if needed rather than making drastic changes at once, potentially shocking plants and causing harm to the growth process.
Products like General Hydroponics’ pH Control Kit, containing both acid (to lower high pH) and alkali solutions (for raising low pH), make the task easier and safer, even for beginners.
This proactive approach helps maintain balance within the system, thereby ensuring healthy, robust plant development and high yield outcomes throughout the growing season.
Key Takeaway:
Keeping your hydroponic garden in tip-top shape requires regular pH checks and adjustments. Use reliable tools, start small with changes, and cater to each plant’s unique needs for a bountiful harvest. It’s not just about survival; it’s helping them thrive.
Calibration and Maintenance of Your PH Meter
If consistency is what we’re aiming at, then calibration becomes key – particularly so when using digital pH meters regularly. Calibration helps counter sensor drift due to usage wear-and-tear, ensuring readings remain accurate over time.
Cleanliness too plays its part – cleaning electrodes after each use prevents build-up that could interfere with future measurements. For storage between uses, keeping electrodes immersed in appropriate solutions such as potassium chloride will prolong their lifespan while preventing them from drying, another factor known to affect measurement reliability negatively.
Understanding Different Plant Needs
Each plant species has its unique set of requirements in terms of optimum conditions to thrive best. Consequently, it is essential to comprehend the particular requirements of each crop you are intending to grow so as to suitably provide for them and guarantee bountiful yields in the long run. For instance, some prefer slightly acidic environments, whereas others lean towards neutral or even alkaline settings. Hence, the importance of doing due diligence beforehand and determining the right parameters to apply on an individual case basis. Remember, the goal isn’t merely to keep them alive but to help them flourish and reach their full potential through careful monitoring and timely interventions whenever required.
Different crops have different optimal pH ranges where they best absorb the nutrients needed for healthy growth. Hence, understanding the individual requirements based on the species grown and maintaining the correct parameters consistently ensures maximal yield outcomes.
This knowledge lets you tailor-make environments that cater specifically to the unique needs of each crop variety, leading to ultimately successful harvests. The same principle applies across all aspects involved in managing successful soilless gardens, including light intensity, durations, temperatures, humidity, etc., emphasizing the importance of thorough research prior to embarking on the journey of the world of modern farming practices via controlled indoor settings offered through hydroponics.
Key Takeaway:
Mastering pH levels in your hydroponic garden is crucial for plant health and productivity. Regular checks, accurate testing techniques, meticulous meter calibration, and understanding individual crop needs are key to success. Remember: a balanced pH equals bountiful harvests.
Navigating High And Low pH Conditions In Hydroponics
If testing reveals high pH readings above seven indicating alkaline conditions, then measures should be taken immediately since most nutrients become less soluble under these circumstances, leading to nutrient deficiencies even though there may still be plenty present within the solution itself. To lower high pH, one could add phosphoric acid or nitric acid gradually until the desired results are achieved. However, care must be exercised, because overuse could potentially damage roots due to its corrosive nature.
On the other hand, low pH below five signals an overly acidic environment where certain elements like iron, manganese, zinc, copper tend to become excessively available causing toxicity issues. Hence, corrective steps ought to be implemented promptly here. Sulfur and lime (calcium hydroxide) are commonly used to return to a normal scope. Remember, always add small increments and allow to settle before retesting, to avoid drastic fluctuations detrimental to overall growth and development. Regardless of whether dealing with highs or lows, patience and precision are vital aspects to bear in mind during the whole procedure. Remember, the goal is to create a stable and conducive environment for thriving, as opposed to chasing the perfect number on a chart. After all, live organisms adapt to minor variations as long as extreme situations are avoided and maintained on a consistent basis throughout the lifecycle, thereby ensuring a healthy and productive harvest at the end of the season.
Key Takeaway:
For a thriving hydroponic garden, keeping pH levels in check is crucial. Commercial adjusting chemicals help balance your system’s acidity or alkalinity as needed. Understanding the specific pH preferences of each plant species you’re growing guides effective adjustments. Be patient and precise when dealing with high or low pH conditions, aiming for stability rather than perfection.
FAQs in Relation to How to Check the pH in Your Hydroponic Garden
How do you test the pH in a hydroponic system?
You can test pH levels using tools like litmus strips, liquid tests, or digital pH meters. Always ensure your testing equipment is clean and calibrated for accurate results.
What pH should a hydroponic garden be?
The optimal pH range for most plants in a hydroponic garden falls between 5.5 to 6.5, although specific plant types may have different requirements.
How often should you check pH in hydroponics?
New growers should check daily while experienced ones can monitor weekly. However, regular checks are crucial as fluctuations affect nutrient absorption.
How do I adjust the pH in my hydroponic system?
If your system’s pH deviates from the optimal range, use commercial adjusting chemicals to correct it. Be sure to follow safety guidelines when handling these products.
Conclusion
Mastering the art of checking pH in your hydroponic garden is a game-changer.
It’s not just about numbers on a scale; it’s understanding how those figures directly impact plant health and yield.
The science behind pH, once unraveled, becomes an ally in nurturing thriving crops.
You’ve learned that optimal levels are key to nutrient absorption – no small matter when you’re striving for high yields!
We dove into testing methods from litmus strips to advanced meters, and even discussed continuous monitoring systems.
Remember: regular calibration ensures accuracy over time.
Maintenance isn’t just for equipment; adjusting your system’s pH when necessary is crucial too.
All plants have unique needs – knowing their preferred conditions can make all the difference between mediocre results and flourishing growth.
Now that you’re an expert on pH maintenance, why not take your knowledge further? At [Your Website], we offer more than just tips on managing pH levels in hydroponics.
We delve deep into everything related to soil-free cultivation techniques – helping growers like yourself achieve remarkable harvests without traditional soil-based gardening constraints.
Ready to take your hydroponic journey further? Visit us at Soilless Growers and let’s grow together!
- Evita questi errori nel gioco: gioca responsabilmente!
- Betandreas ilə Kiberidmana Mərclər – Betandreas-da Kiberidman Oyunlarının Mexanikası – Necə İşləyir?
- Le Meilleur Logiciel de Trading Automatisé pour les Traders Français en 2024
- Mostbet – Mostbet Fantaziya Liqaları – Mobil Uyğunluq və Performans – Mobil Interfeys – Tələblər və Qiymətləndirmə
- 1win Platforması – 1win Nədir və Niyə Kripto Oyunçuları Üçün Uyğundur? – 1win Qeydiyyat – İlk Addım – what to do, what to avoid, and why it matters
- Mostbet – Fantaziya Idmanının Əsas Mexanizmi – Mostbet-də Necə Işləyir – Mostbet-də Mövcud Olan Fantaziya Oyunları
- Glory casino’da Stolüstü Oyunların Qaydaları – Glory casino’da Ruletka Oyununun Əsasları
- Glory casino Canlı Diler Oyunları – Glory casino Canlı Kazino – Hansı Oyunlar Sizi Gözləyir
- 1win hesabına giriş zamanı yaranan maneələri aradan qaldırmaq – Şifrəni unutmaq – 1win-də tez-tez rast gəlinən problem